Draft Documentation
This guide is currently in development. Content may be incomplete or subject to change.
Creating an Outbound VoiceBot Campaign
The complete, end-to-end manual for launching a new outbound calling campaign — from provisioning a new phone number, through the call flow, bot actions, skills and the master database, to loading your contact list, activating the dialer and reviewing results. Every step includes both the platform screens and the equivalent Auralytik CLI commands.
In this guide
Before You Start
An outbound VoiceBot campaign (like Santander Cobranza Outbound - Mora Temprana) needs four building blocks. The platform checks them before it lets you activate, but knowing them upfront saves back-and-forth:
A Voice Channel
The phone number (DID) your calls go out from
A Valid Flow
The call script — must have Start and End steps
A Ready Dataset
The Excel contact list with the numbers to call
Permissions
Campaign access on your user, plus publish rights for approval
Tip: Everything is done from Campaigns in the left menu. If you manage more than one client, make sure the right client is selected first — the campaign list is always per-client. If the campaign will personalize conversations (debts, products, due dates), also plan the master database file (Step 9) before loading contact lists.
CLI Setup (Optional)
Everything in this guide can be done from the web platform. If you prefer the terminal — or you are provisioning campaigns repeatedly — the Auralytik CLI can do the technical steps in seconds. Windows users: download auralytik-cli-win-x64.zip from the official installers URL provided by your Auralytik contact, unzip it (no installer needed) and optionally add the folder to your PATH. The CLI checks for new versions daily and updates itself with auralytik update. One-time setup:
# 1. Configure the connection profile (values provided by your Auralytik contact)
auralytik config set --profile prod \
  --admin-url <admin-api-url> --public-url <public-api-url> \
  --tenant <tenantId> --client-id <cliAppRegistrationId> \
  --scope api://<adminApi>/.default

# 2. Activate the profile and sign in with your Microsoft account
auralytik config use prod
auralytik config login        # opens the browser, reuses your Microsoft session

# 3. Find your client ID (used by every command below)
auralytik client list
Note: the CLI respects the same permissions as the web platform — you can only see and modify the clients your account has access to. Add --json to any command for machine-readable output, or --yes to skip confirmation prompts in scripts. See the coverage table for which steps the CLI covers versus the web platform.
Step 1 — Provision the Phone Number (Voice Channel)
Every outbound campaign calls out from a voice channel: a phone number (DID) with its caller ID and capacity settings. If your organization already has a voice channel you want to reuse, skip to Step 2 — you will simply assign it in the Channels tab. For a new number, the channel must be created first.
Important: new numbers involve the telephony carrier (number acquisition and routing), so this step is normally done together with your Auralytik/partner contact. Request it with: the desired caller ID, the expected calling country, and how many simultaneous calls you need.
With the CLI, an administrator creates the voice channel in one command:
# See which voice architectures are available (infrastructure profile for the number)
auralytik voice-arch list

# Create the voice channel / DID for your client
auralytik voice-channel create --client <clientId> \
  --did +56981325844 \
  --voice-arch <voiceArchitectureId> \
  --caller-id 981325844 \
  --caller-name "Santander" \
  --dial-prefix 333 \
  --strip-country-code 56 \
  --max-concurrent 10

# The command returns the new channel's Id - keep it for Steps 2 and 4
--did / --caller-id
The number in international format, and the caller ID your customers will see on their phones.
--max-concurrent
How many calls can be in progress at the same time on this number. This caps the campaign's calling speed.
Carrier test: after a new number is provisioned, always run one test call before launching the campaign — carriers can be picky about digit formats (prefixes, country codes). The Test with voice button on the campaign page (Step 3) is made for this.
Step 2 — Create the Campaign
Open Campaigns in the left menu. The hub shows every campaign with its status, progress and quick actions:
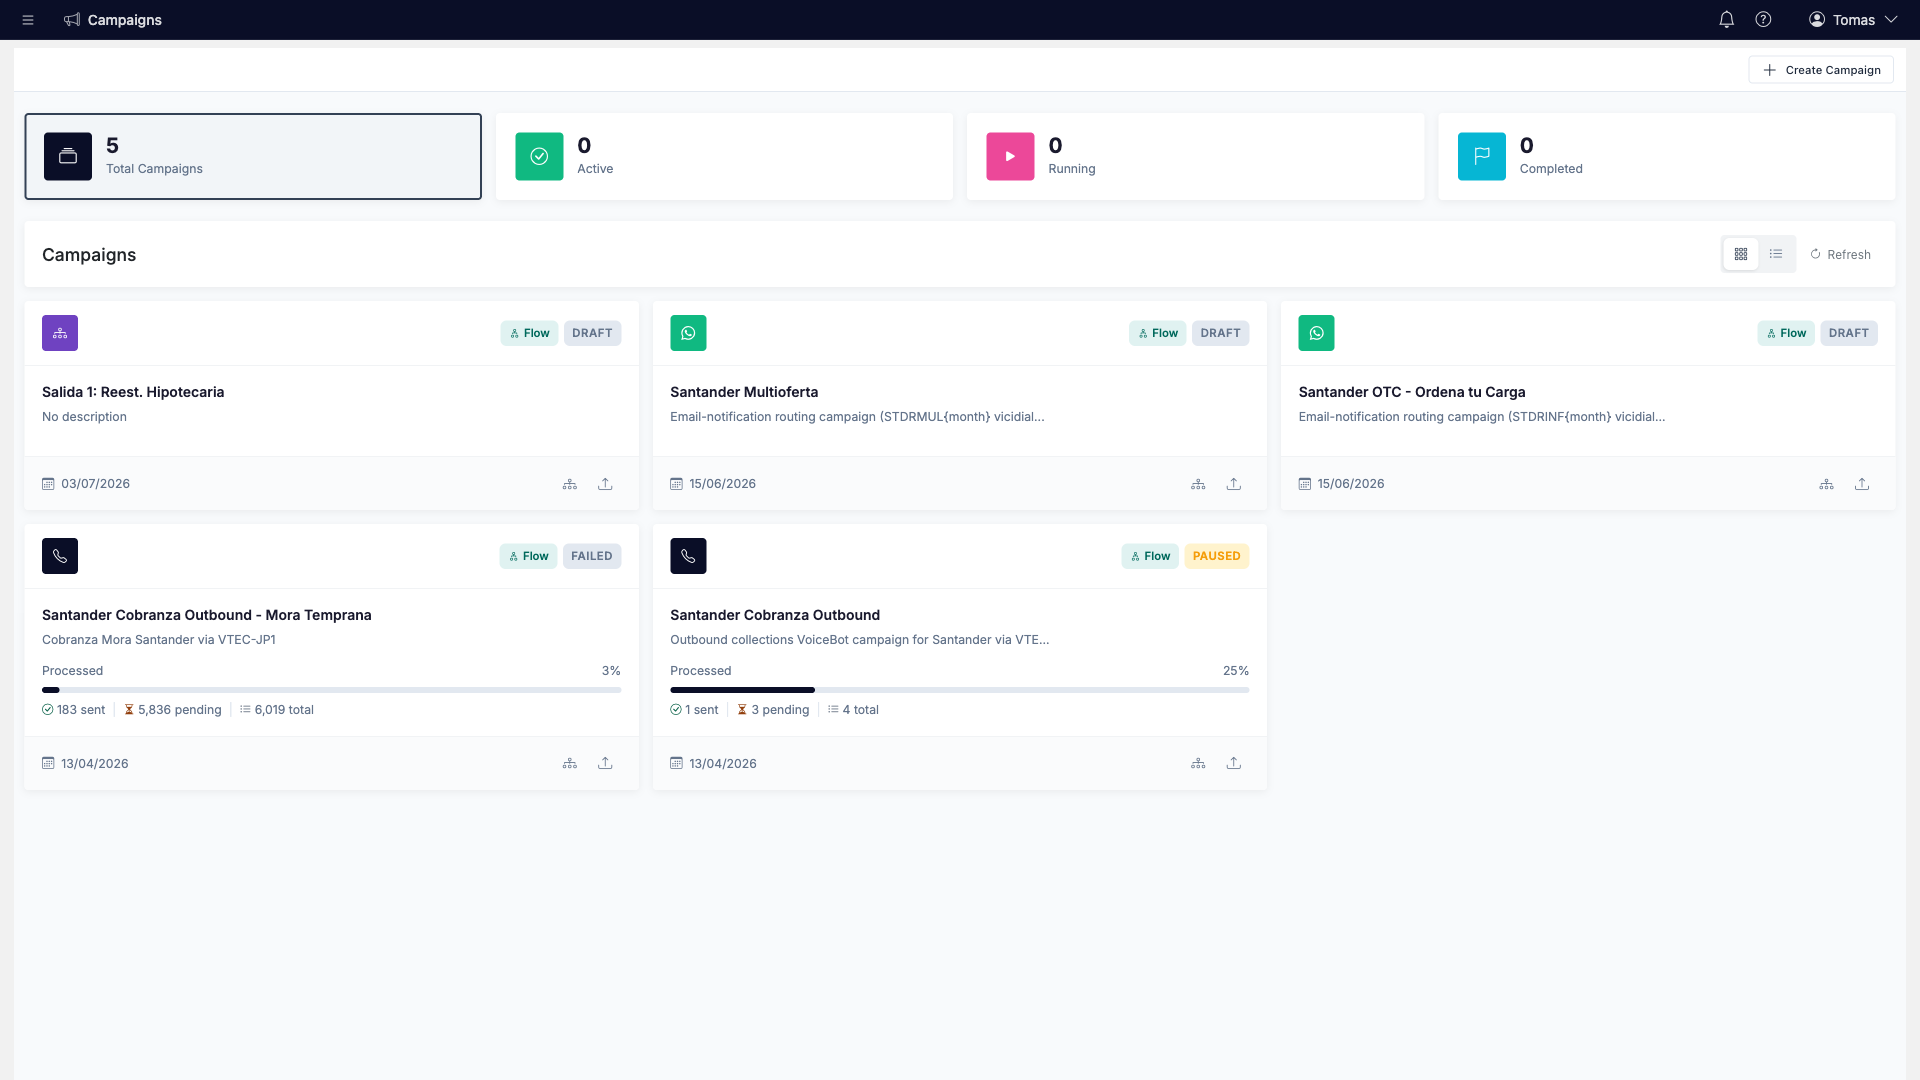
- Click Create Campaign (top right).
- Enter a Name (required) — e.g. Santander Cobranza Outbound - Mora Temprana.
- Optionally add a Description of the campaign's purpose.
- Click Create.
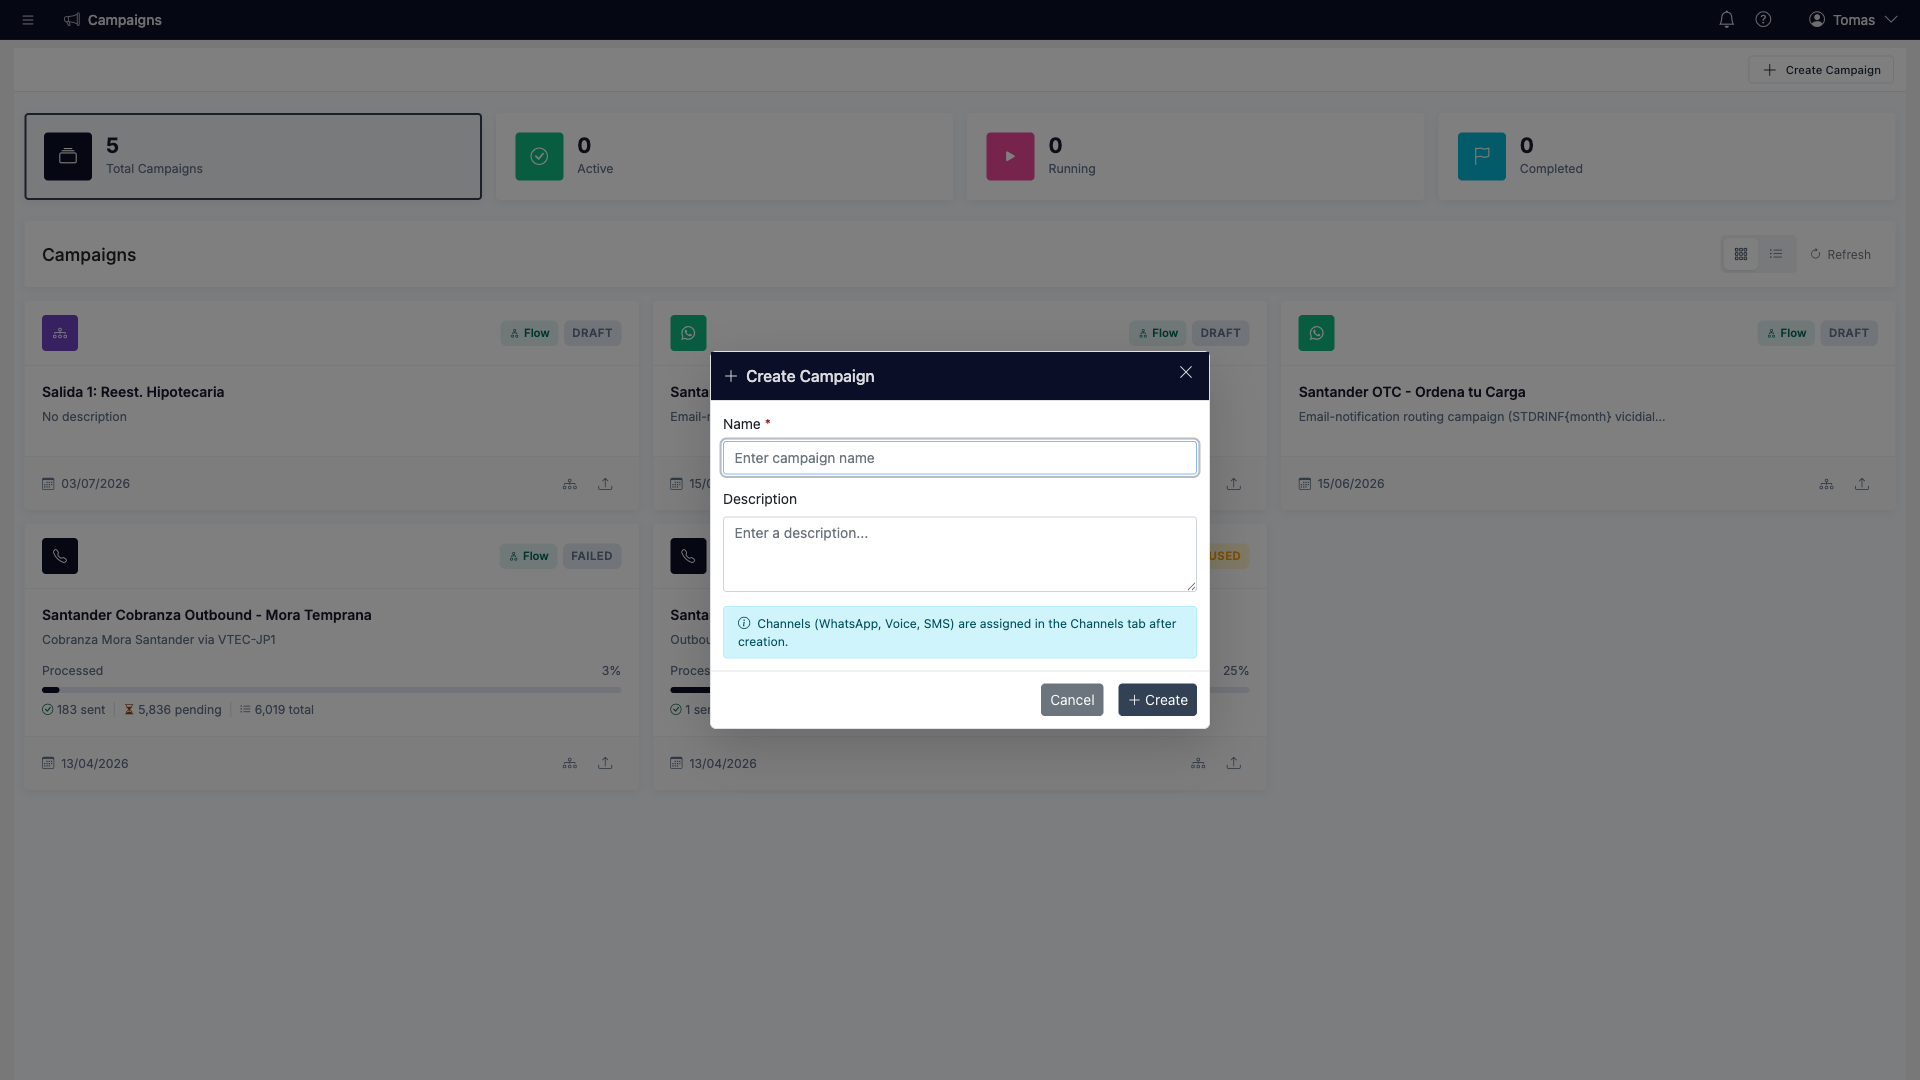
The new campaign is created in Draft status. Notice the dialog's hint: you do not choose voice or WhatsApp here — channels are assigned after creation (Step 4).
CLI alternative — one-shot provisioning
The CLI can create the campaign, its voice flow, the conversation prompt and dialing capacity in a single command (useful when cloning a proven setup for a new product or client):
auralytik campaign provision --client <clientId> \
  --name "Santander Cobranza Outbound - Mora Temprana" \
  --description "Cobranza Mora Santander" \
  --voice-arch <voiceArchitectureId> \
  --channel <channelId> \
  --prompt-file prompt.txt \
  --max-concurrent 10

# Returns: CampaignId, Name, Status (Draft) and FlowId
auralytik campaign list --client <clientId>   # verify it appears
Step 3 — Configure the Overview
Click the campaign card to open its detail page. The Overview tab is the control center: capability cards on top, campaign details, status controls and the sending schedule below.
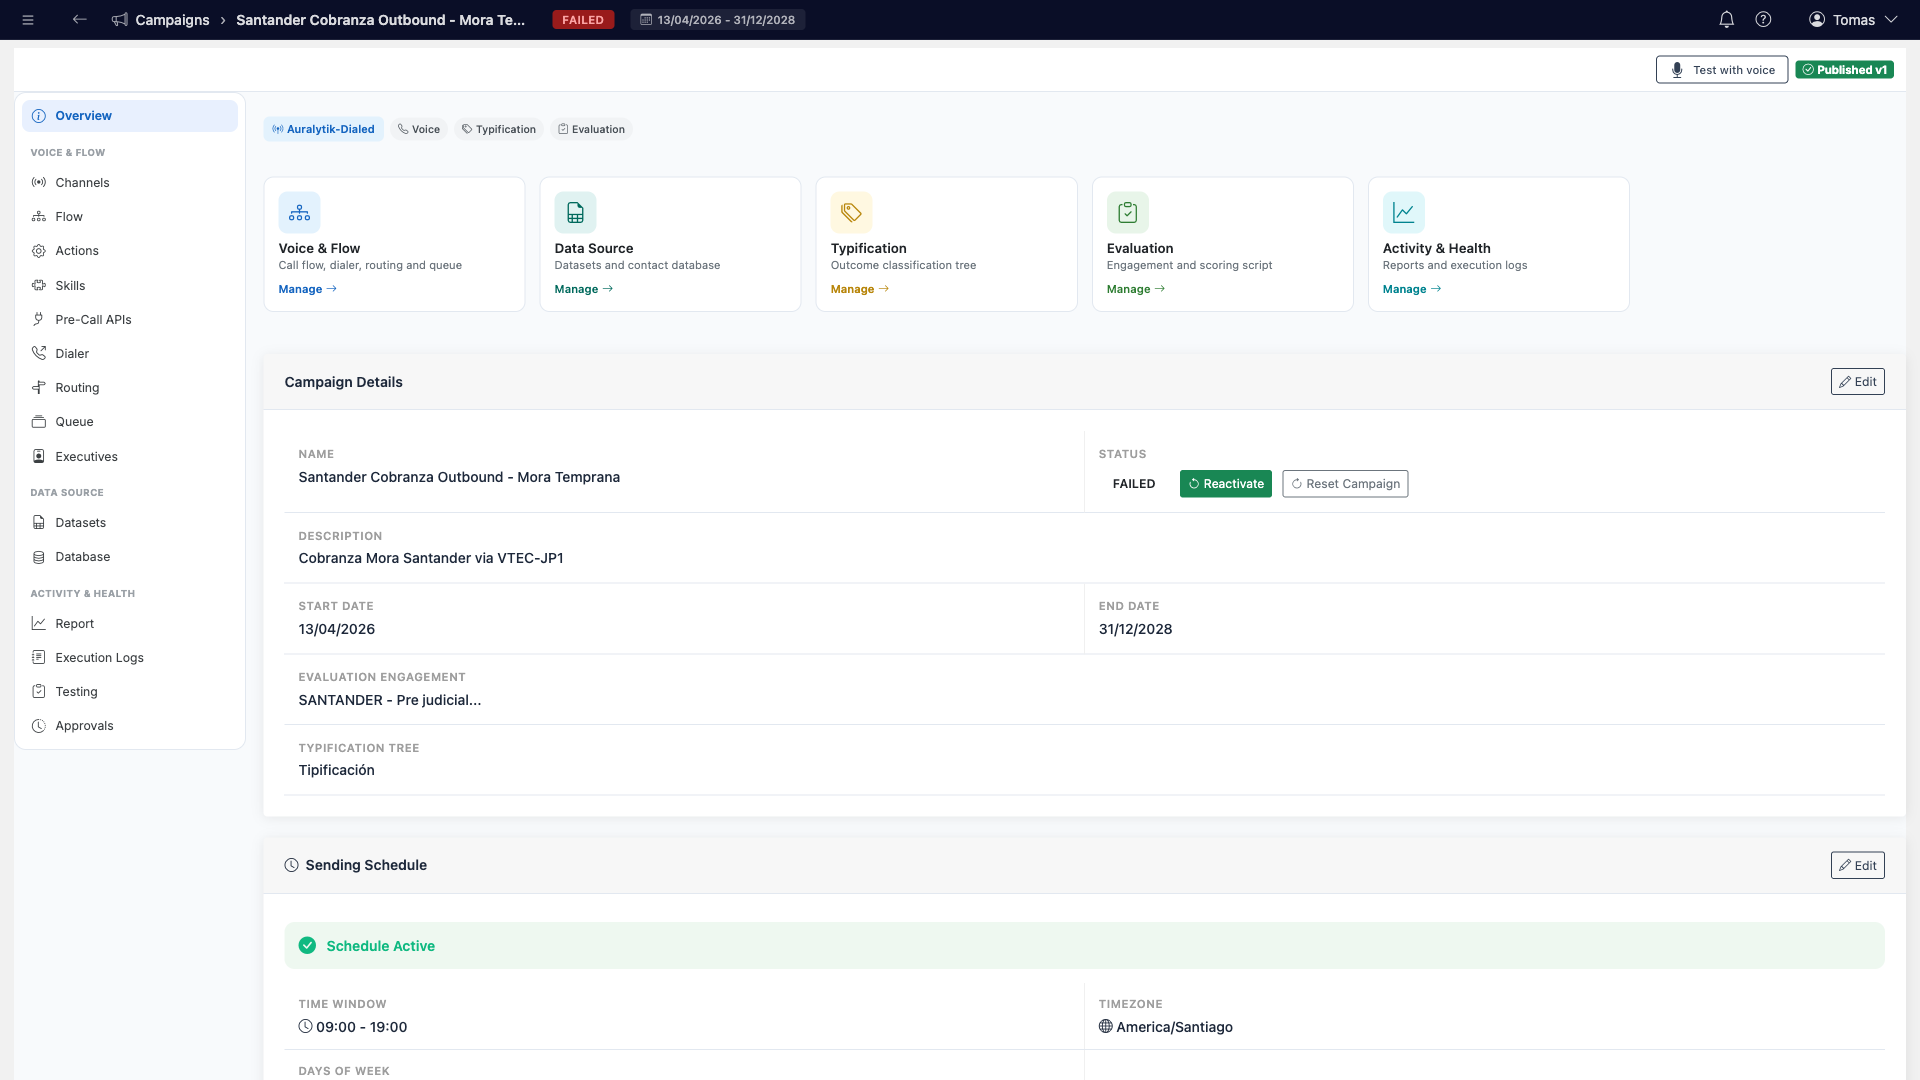
Click Edit on Campaign Details and set:
- Start / End Date — the campaign's active window.
- Capabilities — tick Voice (this is what makes it a VoiceBot campaign and reveals the voice tabs: Flow, Actions, Skills, Dialer…). For a collections campaign like Mora Temprana also tick Typification (call outcome classification) and Evaluation (AI quality scoring).
- Evaluation Engagement — optional; when set, every AI call is automatically evaluated with that engagement's evaluation script and appears in AI Auditing.
- Typification Tree — optional; the catalog of call outcomes used to classify each call (or leave the client default).
- Sending Schedule — the allowed calling window (e.g. 09:00–19:00, America/Santiago). Outside this window the dialer will not place calls, even if the campaign is running.
Save with Save draft. The header shows your configuration state: Published vN when live, Draft pending while you edit (see Step 11).
Step 4 — Assign the Voice Channel
Open the Channels tab. This is where the campaign gets its outgoing phone number — the channel from Step 1:
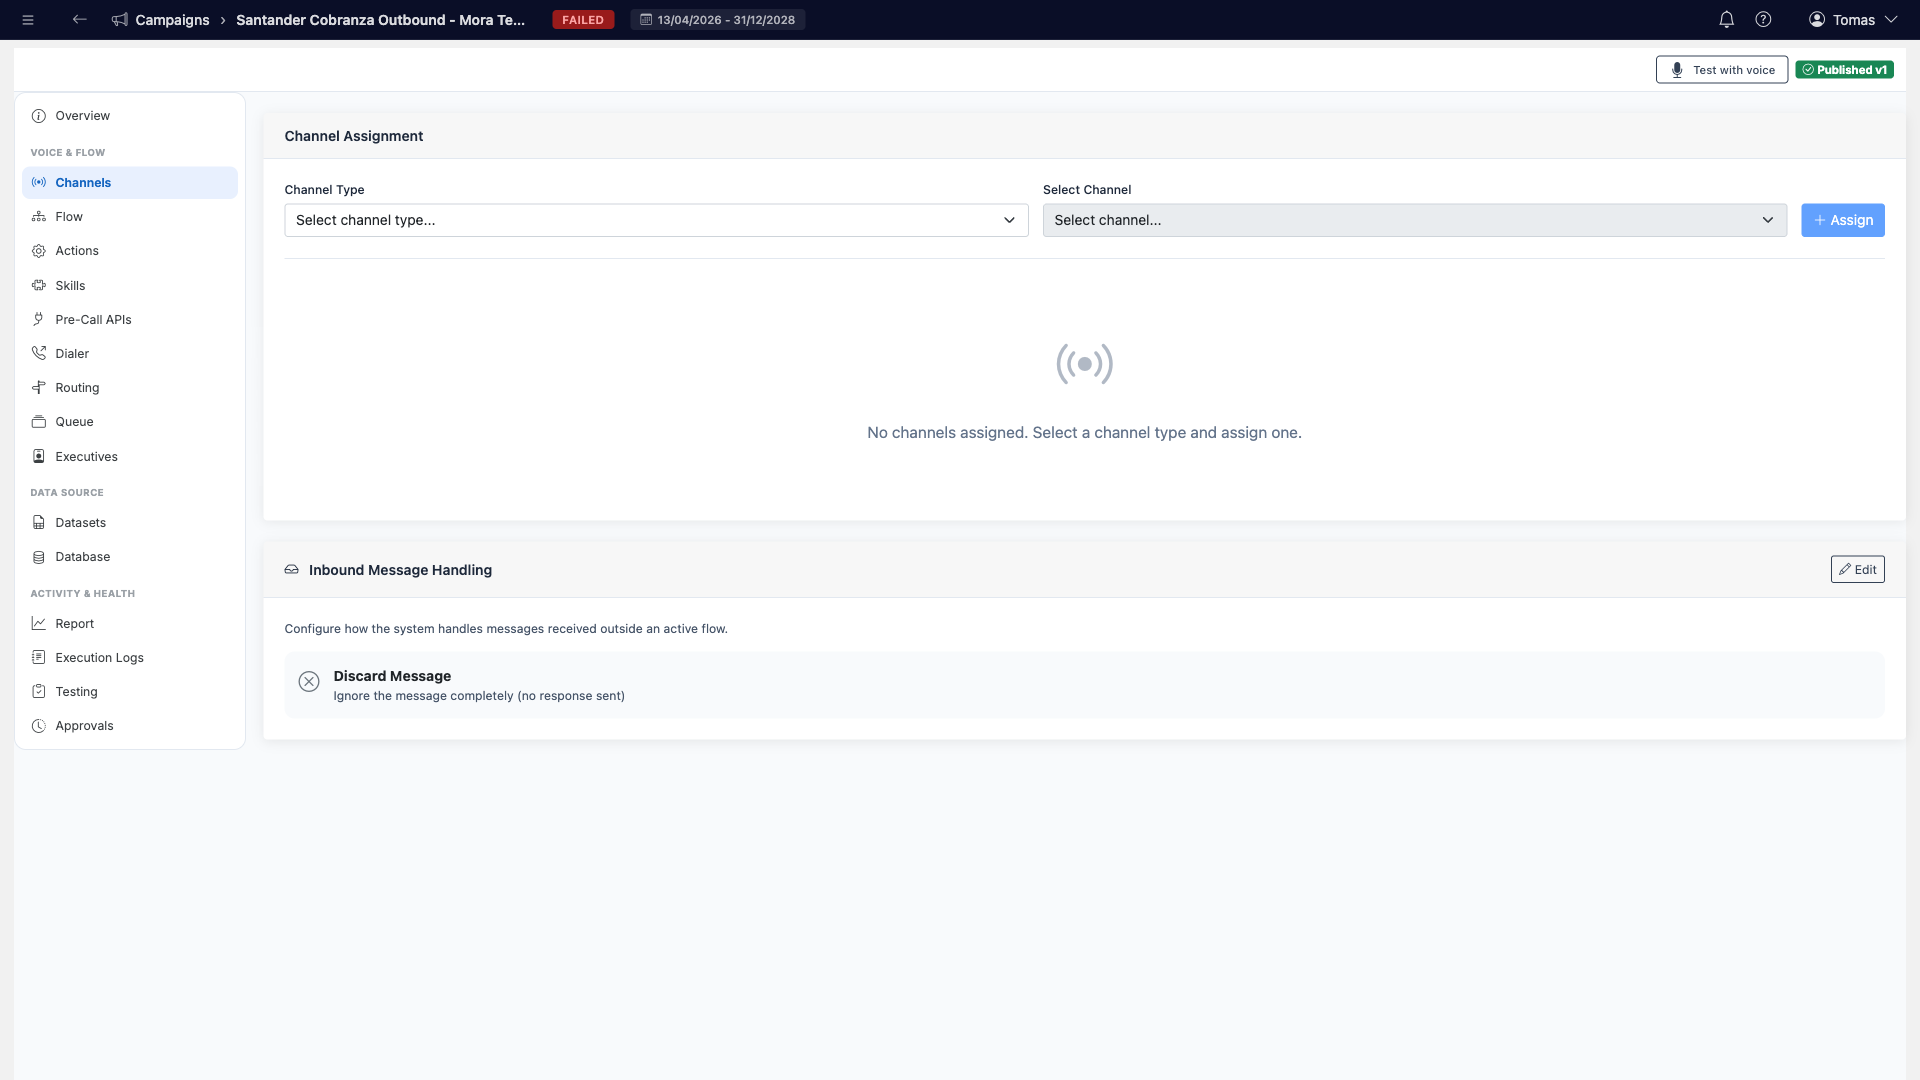
- In Channel Type, choose Voice.
- In Select Channel, pick the number for this campaign.
- Click Assign. The number appears under Assigned Channels.
Important: if the dropdown is empty, the voice channel has not been created yet — go back to Step 1. The campaign only assigns existing channels; it never creates numbers.
CLI alternative
auralytik campaign attach-channel --client <clientId> \
  --campaign <campaignId> --channel <channelId>
Step 5 — Build the Call Flow
The Flow tab shows the campaign's call script status — its name, version, step count and whether it is valid:
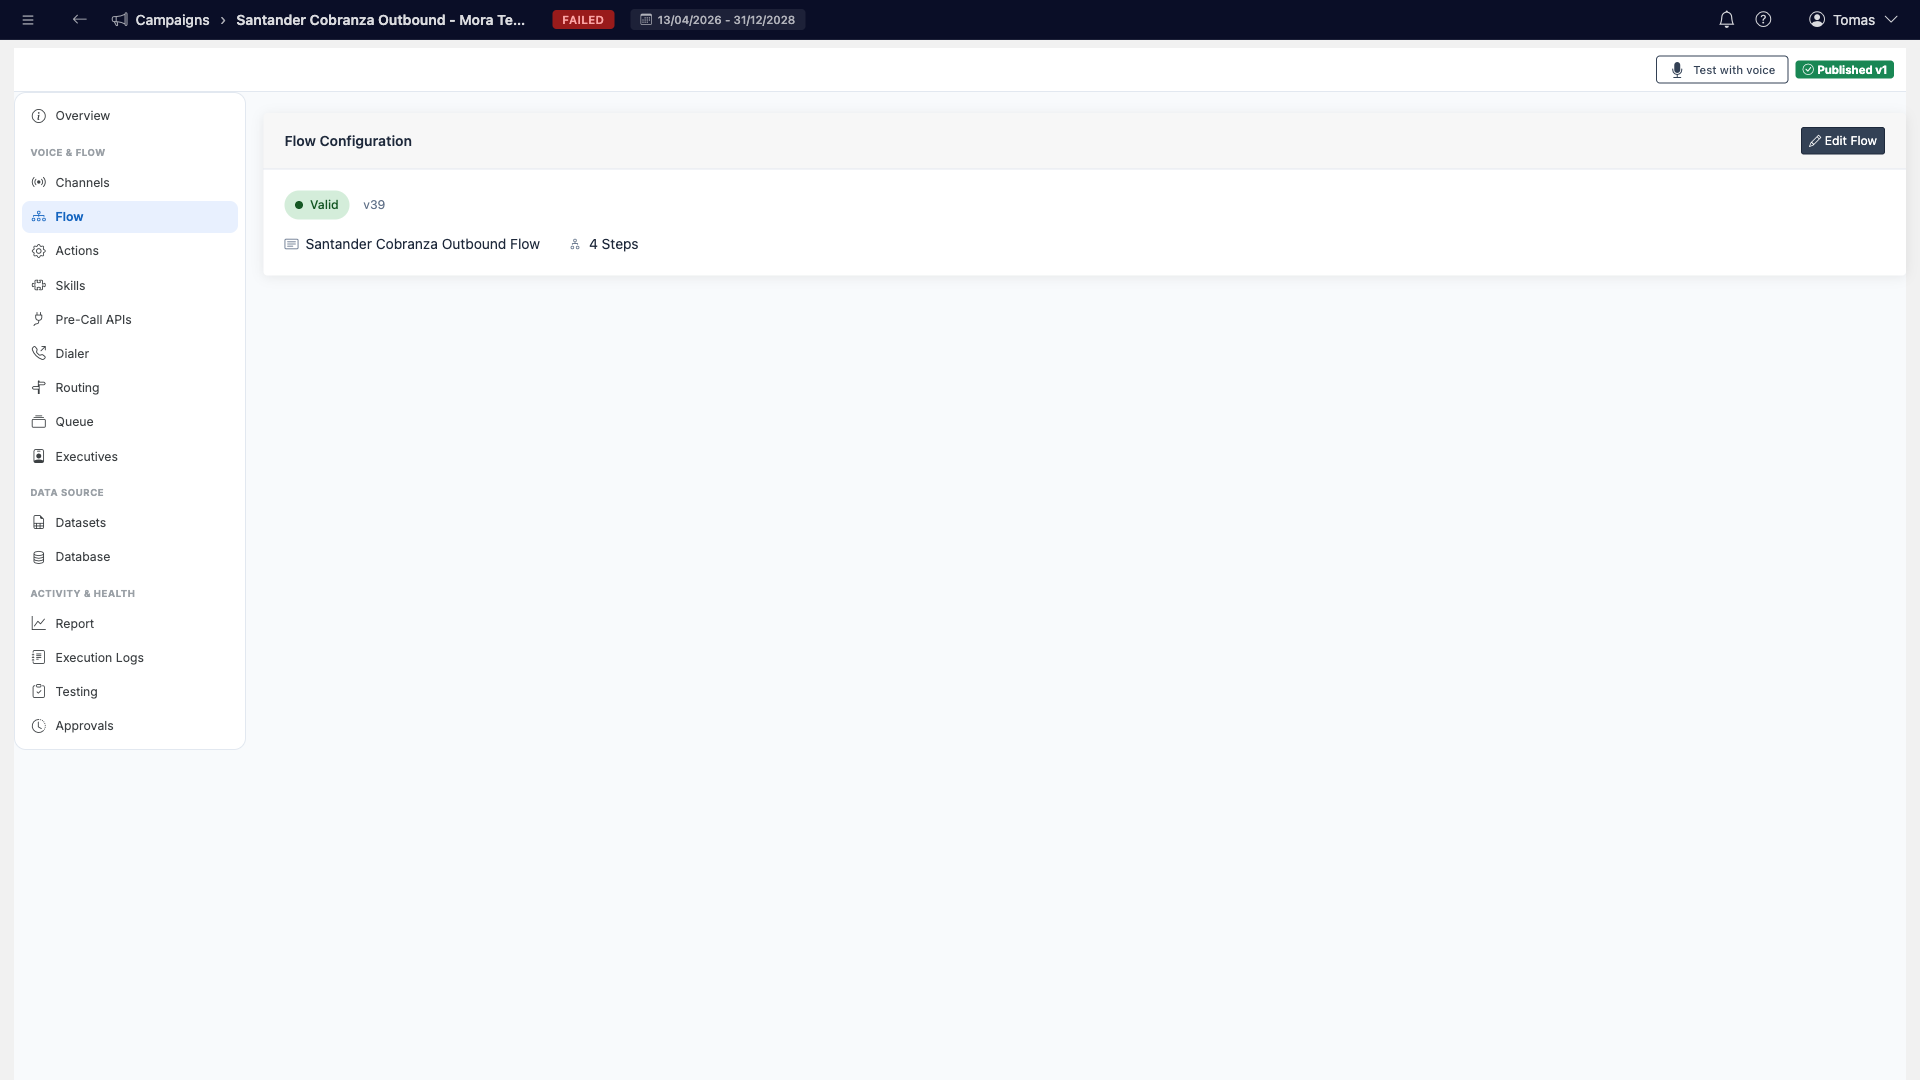
Click Edit Flow to open the visual builder. An outbound VoiceBot flow is short — the intelligence lives in the AI conversation itself:
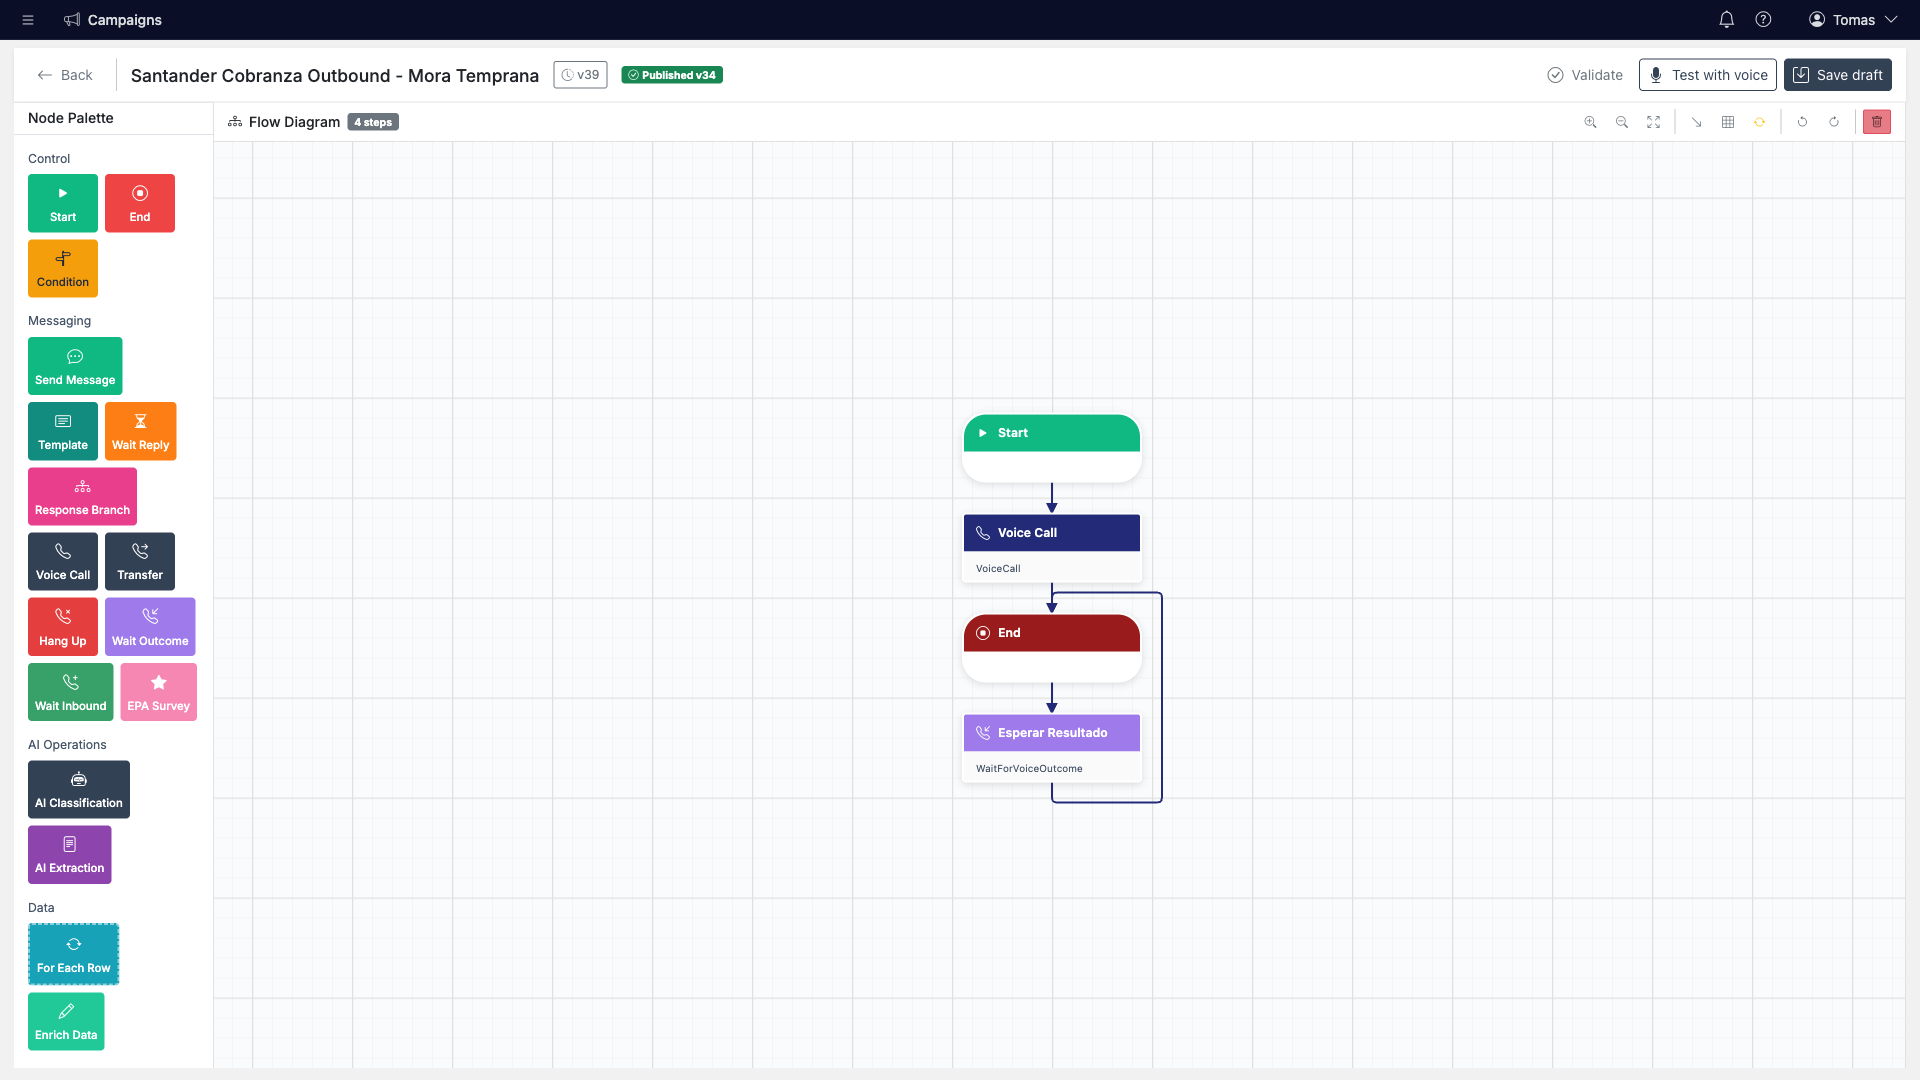
- Start — entry point for every record in the dataset.
- Voice Call — places the AI call. This node holds the conversation prompt (what the bot must say and achieve), the voice, and per-call limits.
- Wait for Result — holds the record until the call finishes and captures the outcome (answered, no answer, voicemail…), which drives retries.
- End — marks the record as processed.
Validation rule: the flow must contain at least a Start and an End step, otherwise the campaign cannot be activated ("Flow must have Start and End nodes").
For the complete catalog of step types and their configuration, see the Flow Steps Reference.
CLI alternative — inspect the flow
auralytik campaign list --client <clientId>          # find the FlowId
auralytik flow get <flowId> --client <clientId>      # inspect steps and prompt
Step 6 — Configure Bot Actions
Actions are the tools the AI can use during the live call. The bot decides when to invoke each one based on its description. The Actions tab lists them — here the two actions of the Santander collections campaign: one to query the authenticated customer's overdue products, and one that must always register the management result before hanging up:
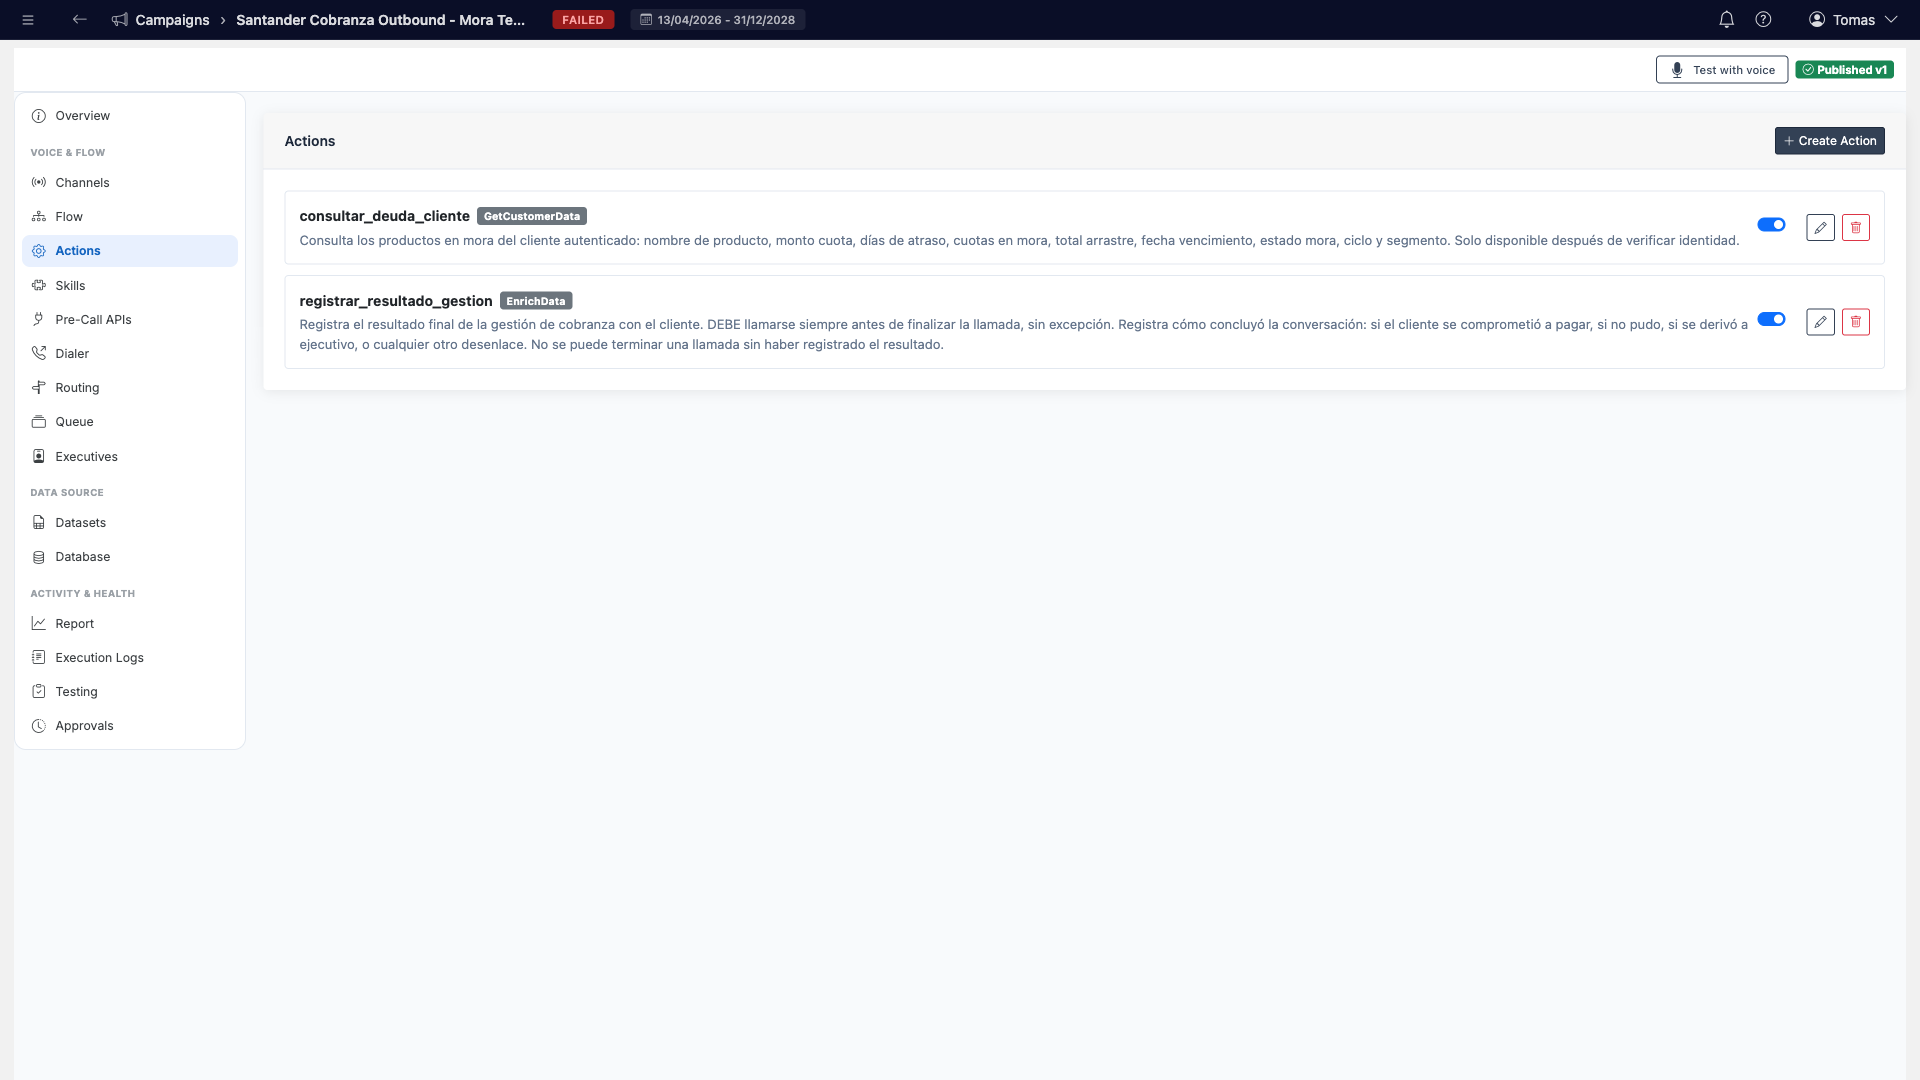
Click Create Action and fill in:
- Function Name (required) — unique identifier, e.g.
consultar_deuda_cliente. - Action Type — what the action does (see below).
- Description — this text is what the AI reads to decide when to use the action. Be explicit: "MUST always be called before ending the call" produces exactly that behavior.
Get Customer Data
Secure lookup of the customer's record in the master database (Step 9), with allowed/blocked fields and optional prior authentication.
Enrich Data
Captures conversation results into fields you define (e.g. payment commitment, reason) — the collections wrap-up action.
Authenticate / DB Lookup
Identity verification against master-database columns (exact/fuzzy match) or an external API, with per-outcome AI instructions.
Transfer / API Call / WhatsApp / Hangup
Hand off to an executive or IVR, call an external API mid-conversation, send a WhatsApp, or end the call.
Each action also supports an Availability Schedule (days + time windows, per-state AI instructions, and an alternative action used outside hours — e.g. offer a callback instead of transferring), and an Active toggle to enable/disable it without deleting.
Full per-type configuration detail (API mappings, authentication outcomes, transfer methods) is covered in the Voice Actions guide and API Integrations guide.
CLI alternative — list, clone and wire actions
auralytik action list --client <clientId>               # list actions + their IDs
auralytik action get <actionId> --client <clientId>     # inspect full configuration

# Clone a proven action from another campaign (creating from scratch is web-only)
auralytik action copy --client <srcClientId> --source <actionId> \
  --to-client <clientId> --to-campaign <campaignId>

# Assign the campaign's actions to its flow
auralytik flow set-actions --client <clientId> \
  --flow <flowId> --actions <actionId1>,<actionId2>
Step 7 — Skills (Playbooks) & Contexts
Skills — also called playbooks — are reusable, versioned instruction sets that extend the bot's behavior (e.g. how to handle a specific product, objection handling, regulatory scripts). The base conversation prompt lives in the flow's Voice Call step (Step 5); skills add modular knowledge on top and can be shared across campaigns.
The campaign's Skills tab manages which skills are enabled here:
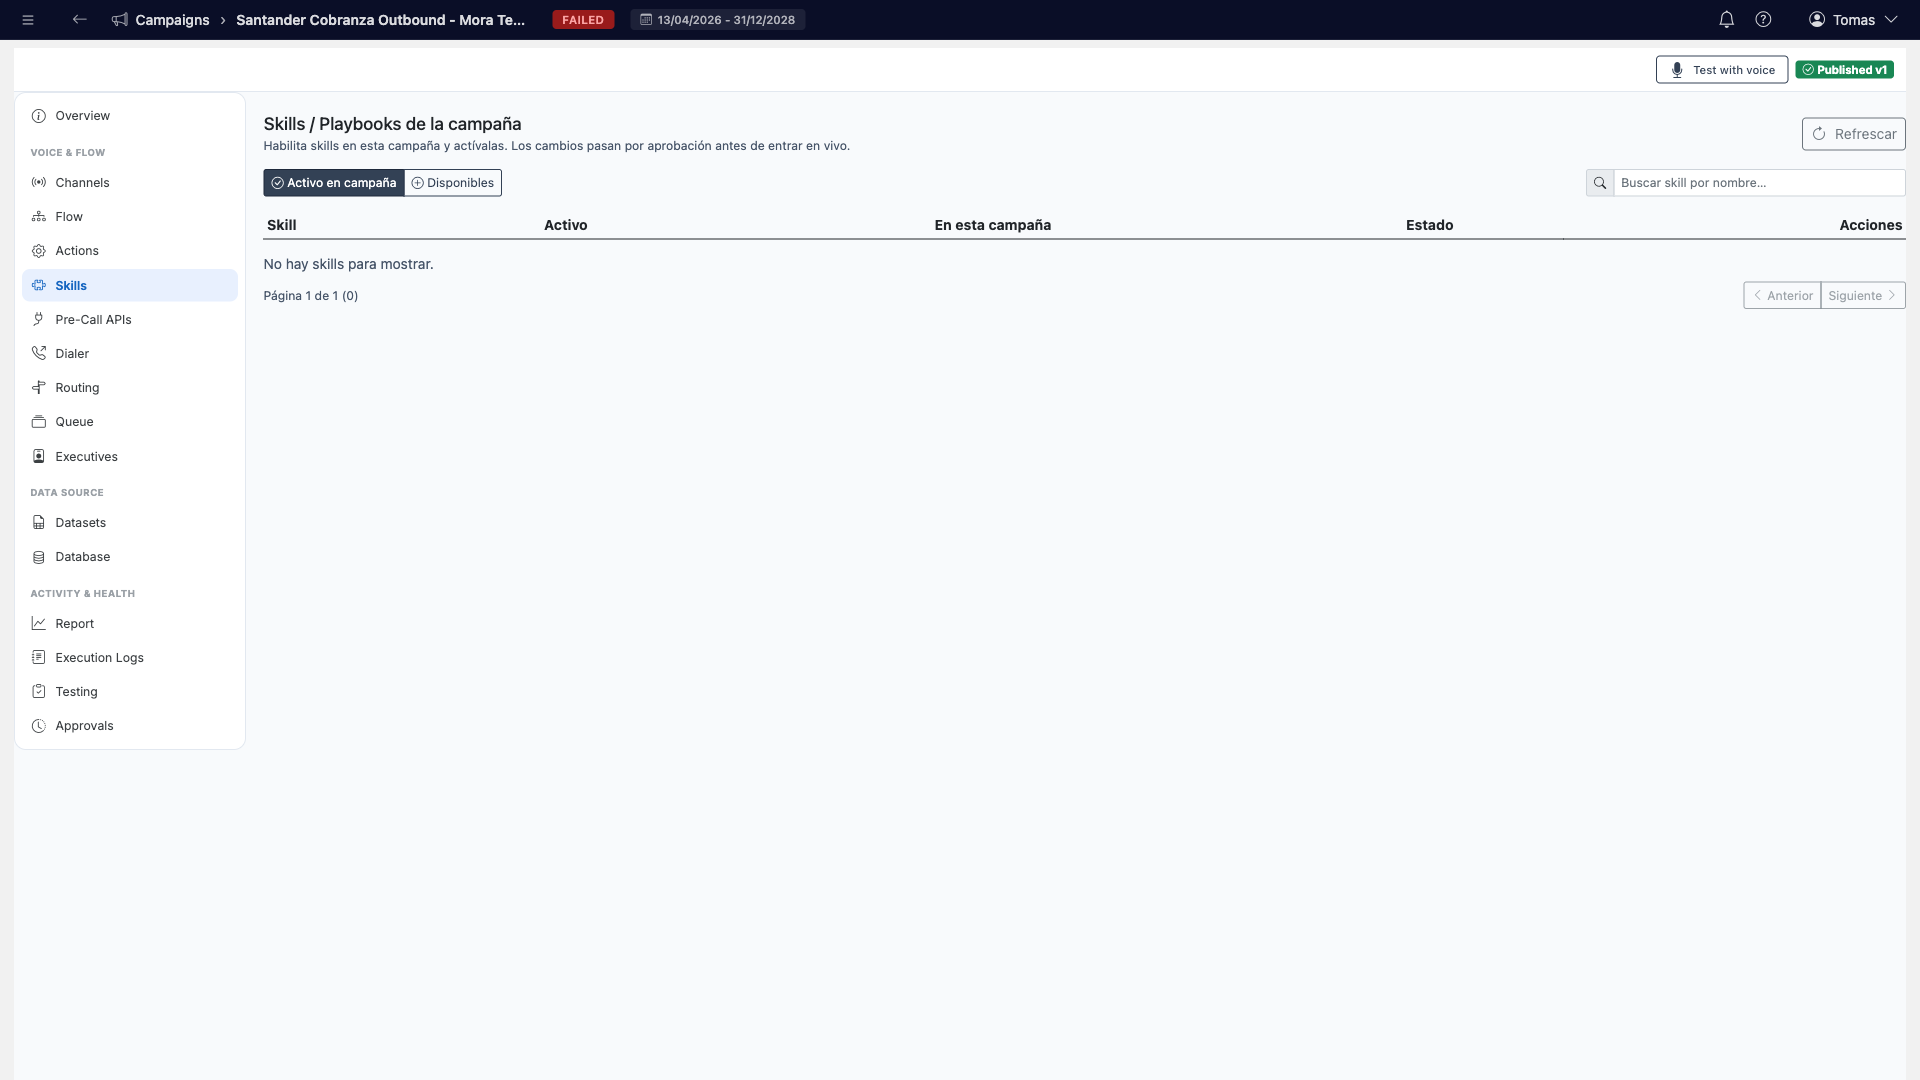
- Available view — lists the client's skill library. Use Enable here to attach one to this campaign, or Remove from campaign to detach it.
- Activate / Deactivate — turns a skill on or off.
- Content expands a read-only view of the skill's instruction blocks; History shows its versions.
Governance: every enable/activate change on this tab creates a pending request that must be approved before going live (approve from this page or from the Approvals tab). Nothing changes the live bot immediately.
Editing skill content and Contexts
The skill's content is edited in AI Knowledge → Playbook Builder (not in the campaign). There you build the skill as ordered instruction blocks; blocks have a type, and this is where Contexts live:
- Context block — background information for the AI (product facts, policies, reference data). Add it via Blocks → Add Instruction Block → type "Context", write the content (supports
{{variable}}placeholders like{{customer.name}},{{campaign.name}}), and optionally an include-condition so it is only injected when relevant. - Other block types: Role, Task, Constraints, Output format, Tone & style. Block order = prompt assembly order.
- Priority (General tab) decides which skill wins when several match; Triggers are a keyword fallback for mid-call routing (primary routing is decided by the model).
- Skills are versioned with the same draft → submit → approve & publish workflow as the campaign.
Tip: a first outbound campaign can go live with no skills — the flow's prompt plus the actions of Step 6 are enough. Add skills when you need reusable or campaign-spanning knowledge. Skills management is web-only (no CLI).
Step 8 — Dialer Settings
The Dialer tab controls calling pace and retry behavior:
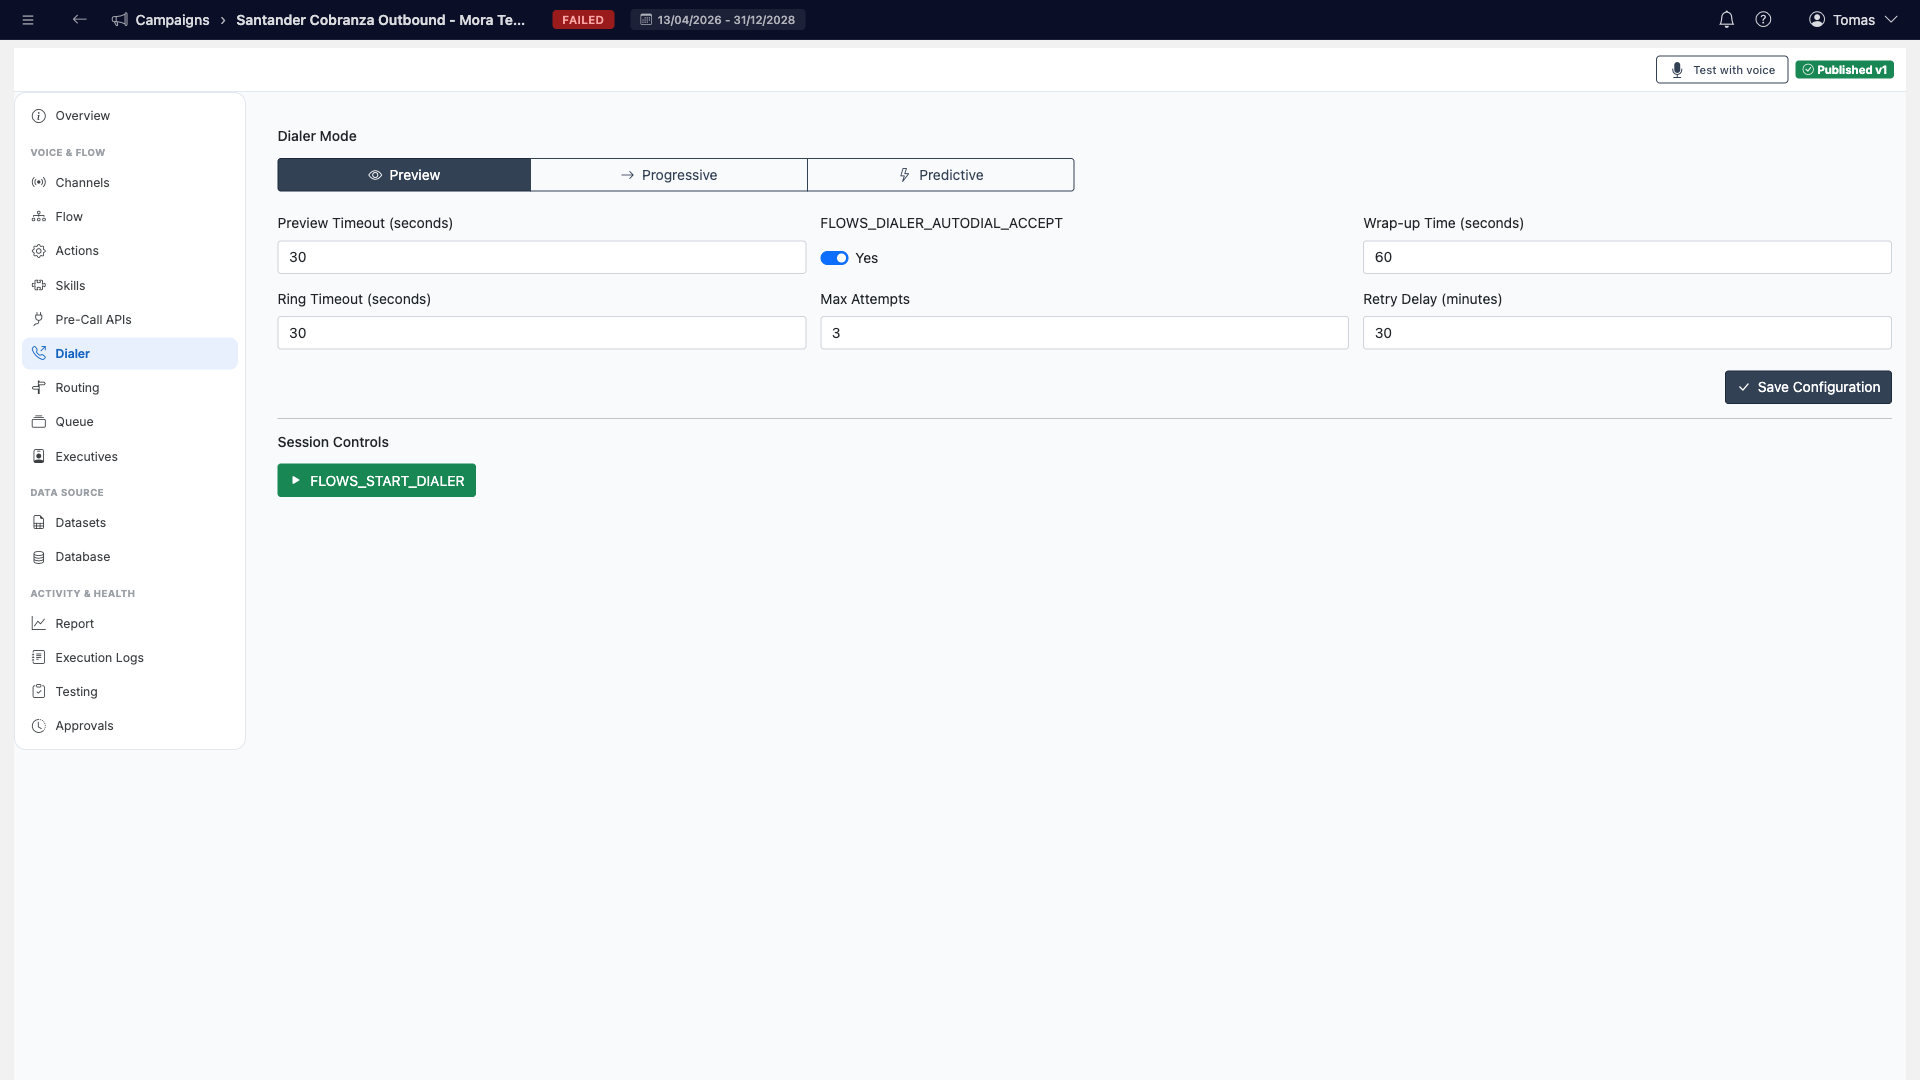
Dialing Mode
Preview, Progressive or Predictive. For fully automated VoiceBot campaigns the default works out of the box.
Ring Timeout
Seconds to let the phone ring before counting the attempt as no-answer.
Max Attempts & Retry Delay
How many times to retry each number and how many minutes to wait between attempts.
Click Save Configuration when done. Remember the effective calling speed is also capped by the channel's max concurrent calls (Step 1) and the sending schedule (Step 3).
Step 9 — Import the Master Database
The campaign Database is the master data store: one record per customer with everything the bot may need mid-call — overdue products, amounts, due dates, segments. Load it before the contact list, because:
- The Get Customer Data and Authenticate actions (Step 6) read from it during the call.
- Dataset ingestion (Step 10) can match each phone against the database and warn about numbers with no master record.
Open the Database tab and click Import. The wizard walks you through:
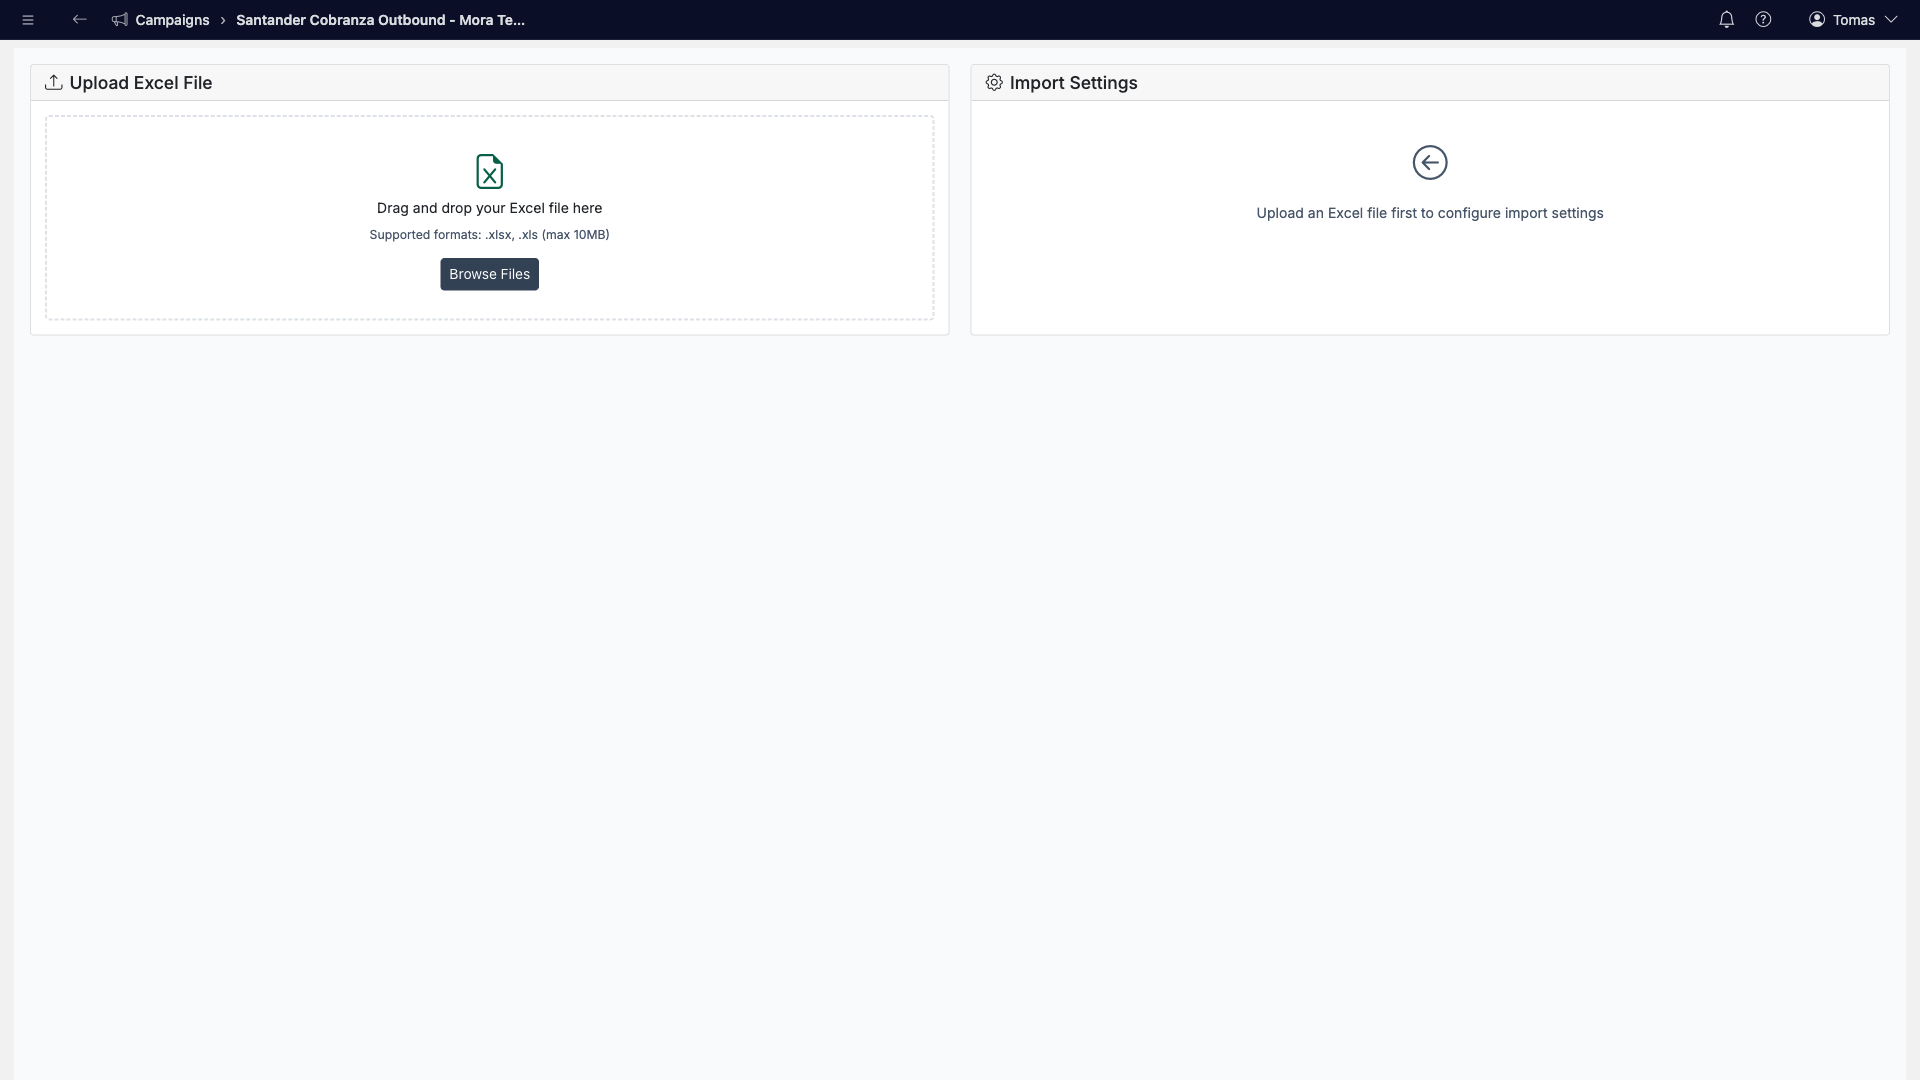
- Upload Excel File — the master spreadsheet (.xlsx/.xls).
- Review Column Schema — confirm each column's data type. The importer suggests types; pay special attention to RUT columns (dedicated RUT types), Phone, dates, and mark confidential columns as Sensitive.
- Unique Identifier Column (required) — the key that identifies each customer, typically the RUT; supports a composite key of up to 3 columns (e.g. RUT + product).
- Import Mode — Add / Update (default: upserts by identifier — use this for periodic refreshes) or Replace All (wipes and reloads).
- Start Import — progress, then inserted/updated/error counts.
After importing, the Database tab shows the records grid with search, Excel export and the import history:
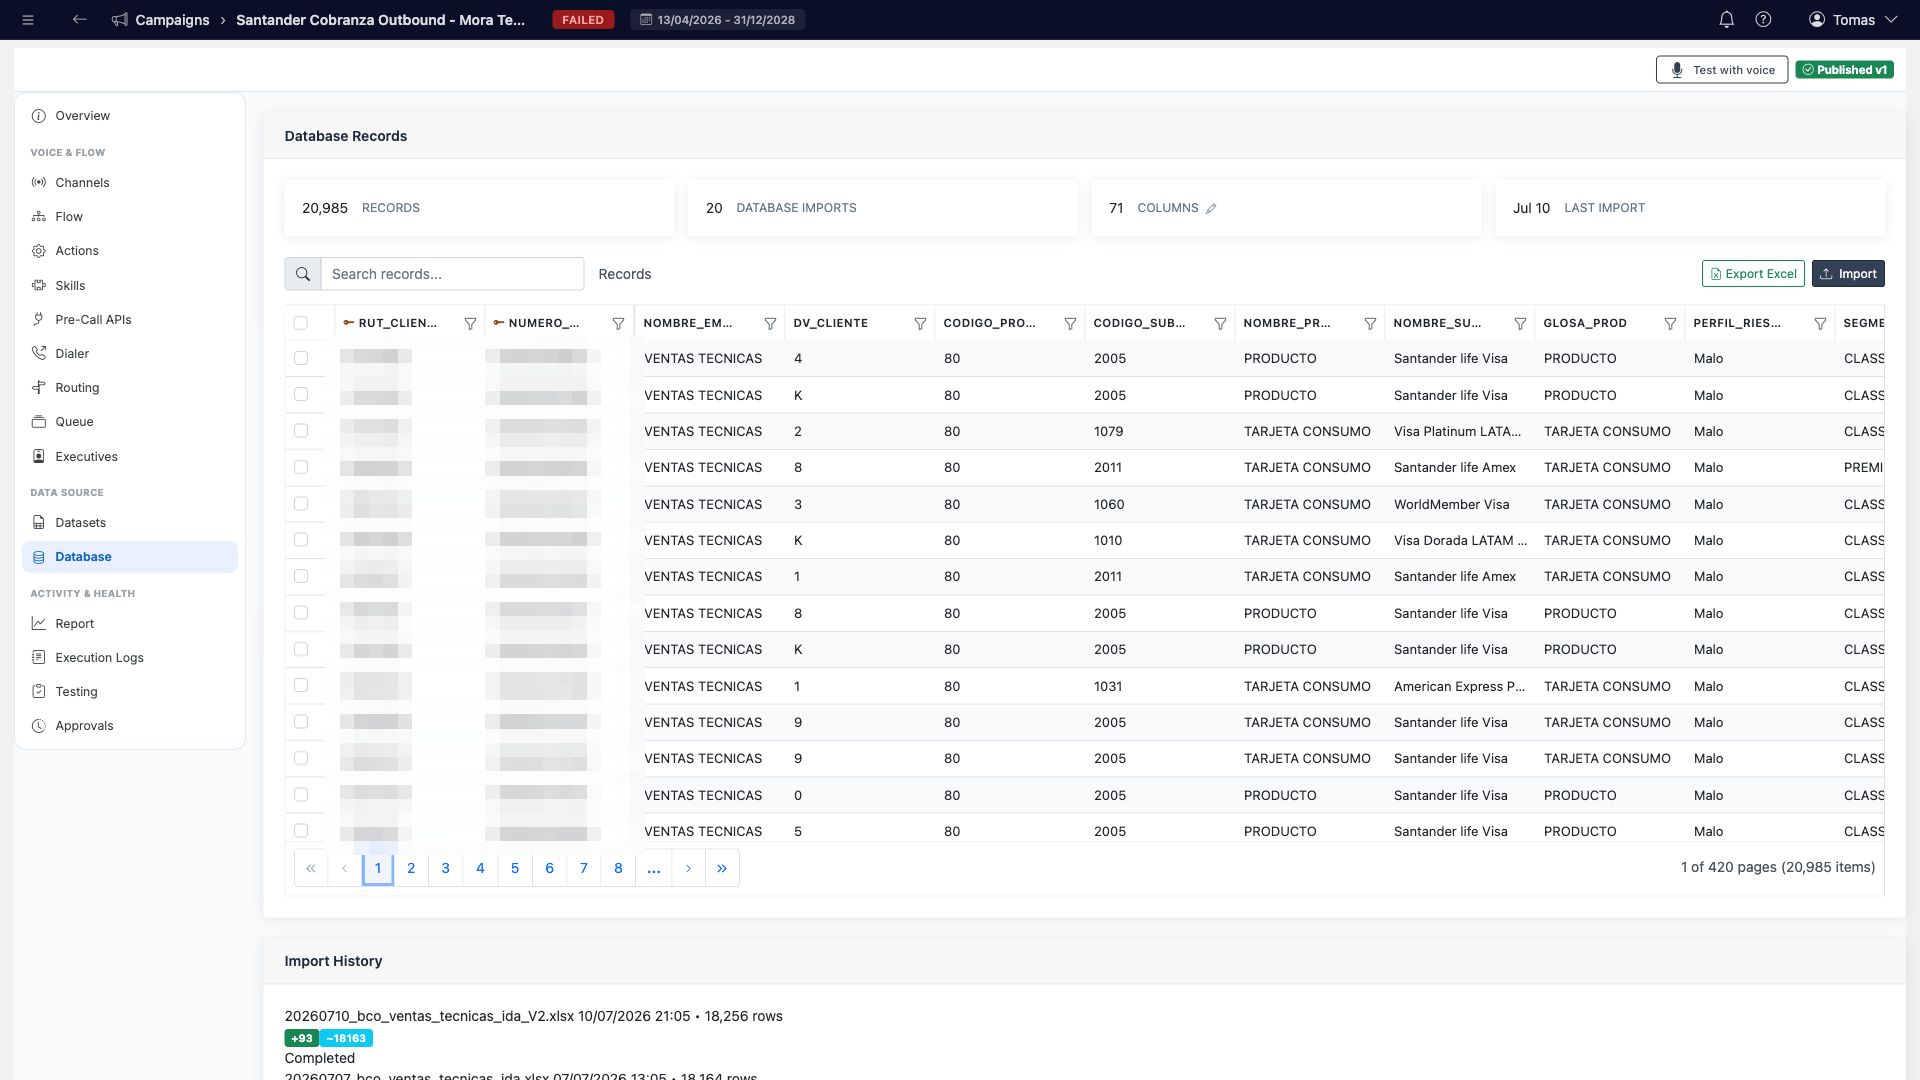
Deep dive: schema management, record versioning, per-record history and database↔dataset integration are covered in the Campaign Database guide. Database import is web-only (no CLI).
Step 10 — Upload the Contact List (Dataset)
The Datasets tab holds the lists of contacts the campaign will call — each calling wave is one dataset. Each upload becomes a card with its row count and execution history:
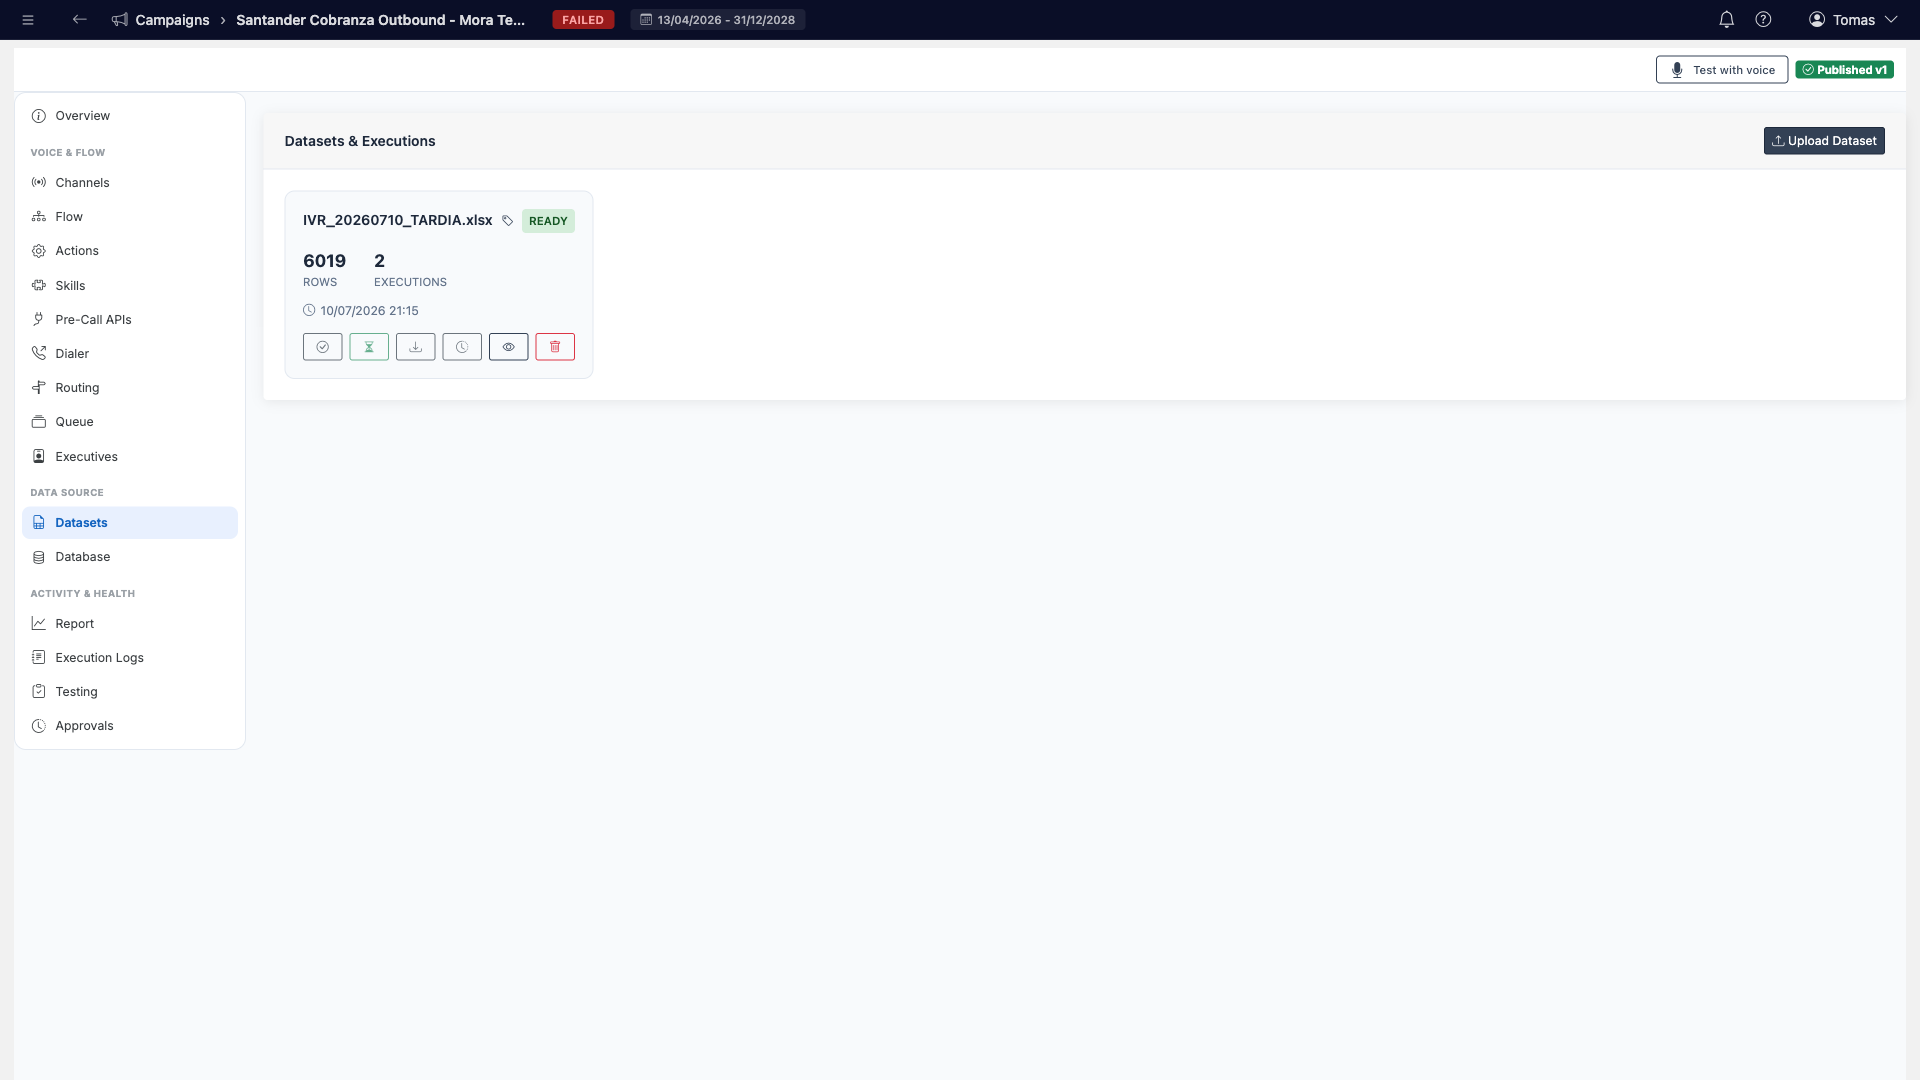
Click Upload Dataset to open the upload wizard:
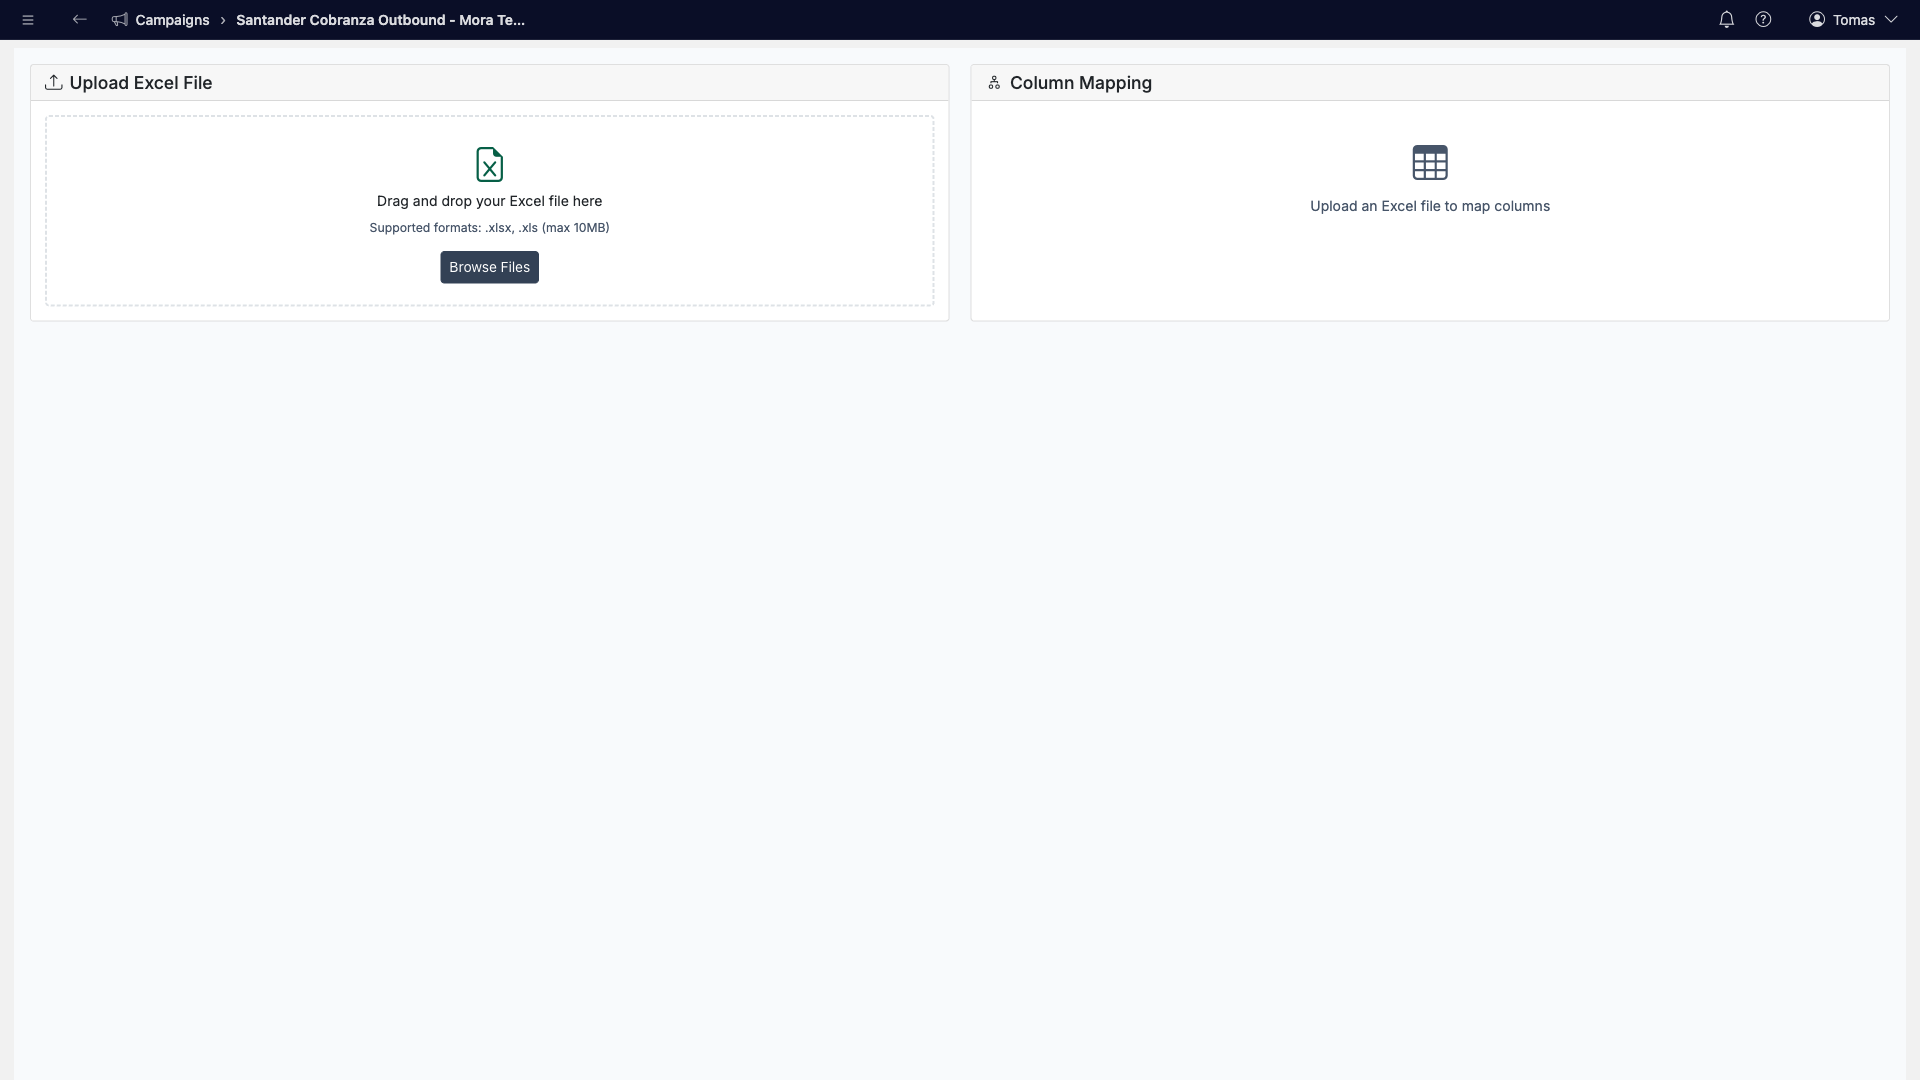
- Drag in your Excel file (.xlsx / .xls, max 10 MB). The columns are detected automatically.
- In Column Mapping, select the Phone Column (required). Map the Identifier Column (RUT) so each call is linked to its master-database record from Step 9, and optionally a Name Column.
- Click Validate & Ingest. The platform reports invalid phones, duplicates inside the file, rows already in the campaign, and phones with no match in the database — then click Proceed with Ingestion.
Once ingested, the dataset shows Ready — the state required for activation. Validation options, execution tracking and enrichment export are covered in the Dataset Management guide. Dataset upload is web-only (no CLI).
Step 11 — Review & Publish
Campaign configuration is versioned with an approval workflow, so a running campaign is never changed by accident:
- While you edit, the header shows Draft pending — production keeps running the last published version.
- When the configuration is ready, click Submit for review.
- A user with publish rights opens the same page and clicks Approve & Publish (or Reject with a reason). The header then shows Published vN.
- The Approvals tab keeps the full history — including pending skill changes from Step 7.
Tip: before going live, use Test with voice (top of the campaign page) to place a test conversation against the draft flow, and the Testing tab to run scripted QA scenarios.
Step 12 — Activate & Start Calling
On the Overview tab, next to the status badge, click Activate. The button only enables when the checklist passes:
- At least one channel assigned (Step 4)
- A valid flow with Start and End (Step 5)
- At least one dataset in Ready state (Step 10)
If something is missing, the page lists exactly what under Requirements to activate campaign.
Once the campaign is Active, start dialing:
- Go to the Datasets tab and press the green ▶ Execute button on the dataset card, or use Start Campaign in the header.
- A confirmation dialog shows the dataset, total rows and the channel that will be used — voice campaigns warn you that real calls will be placed. Confirm with Start Execution.
While running: the campaign configuration is locked (channels, flow, settings). Pause the campaign to make changes, then resume. Calls only go out inside the sending schedule window.
Step 13 — Monitor & Results
The Campaign Monitor follows the execution live: progress, sending status, success/failure counters, telephony health and per-record state. Controls to Pause, Resume, Cancel or Reset are on the right:
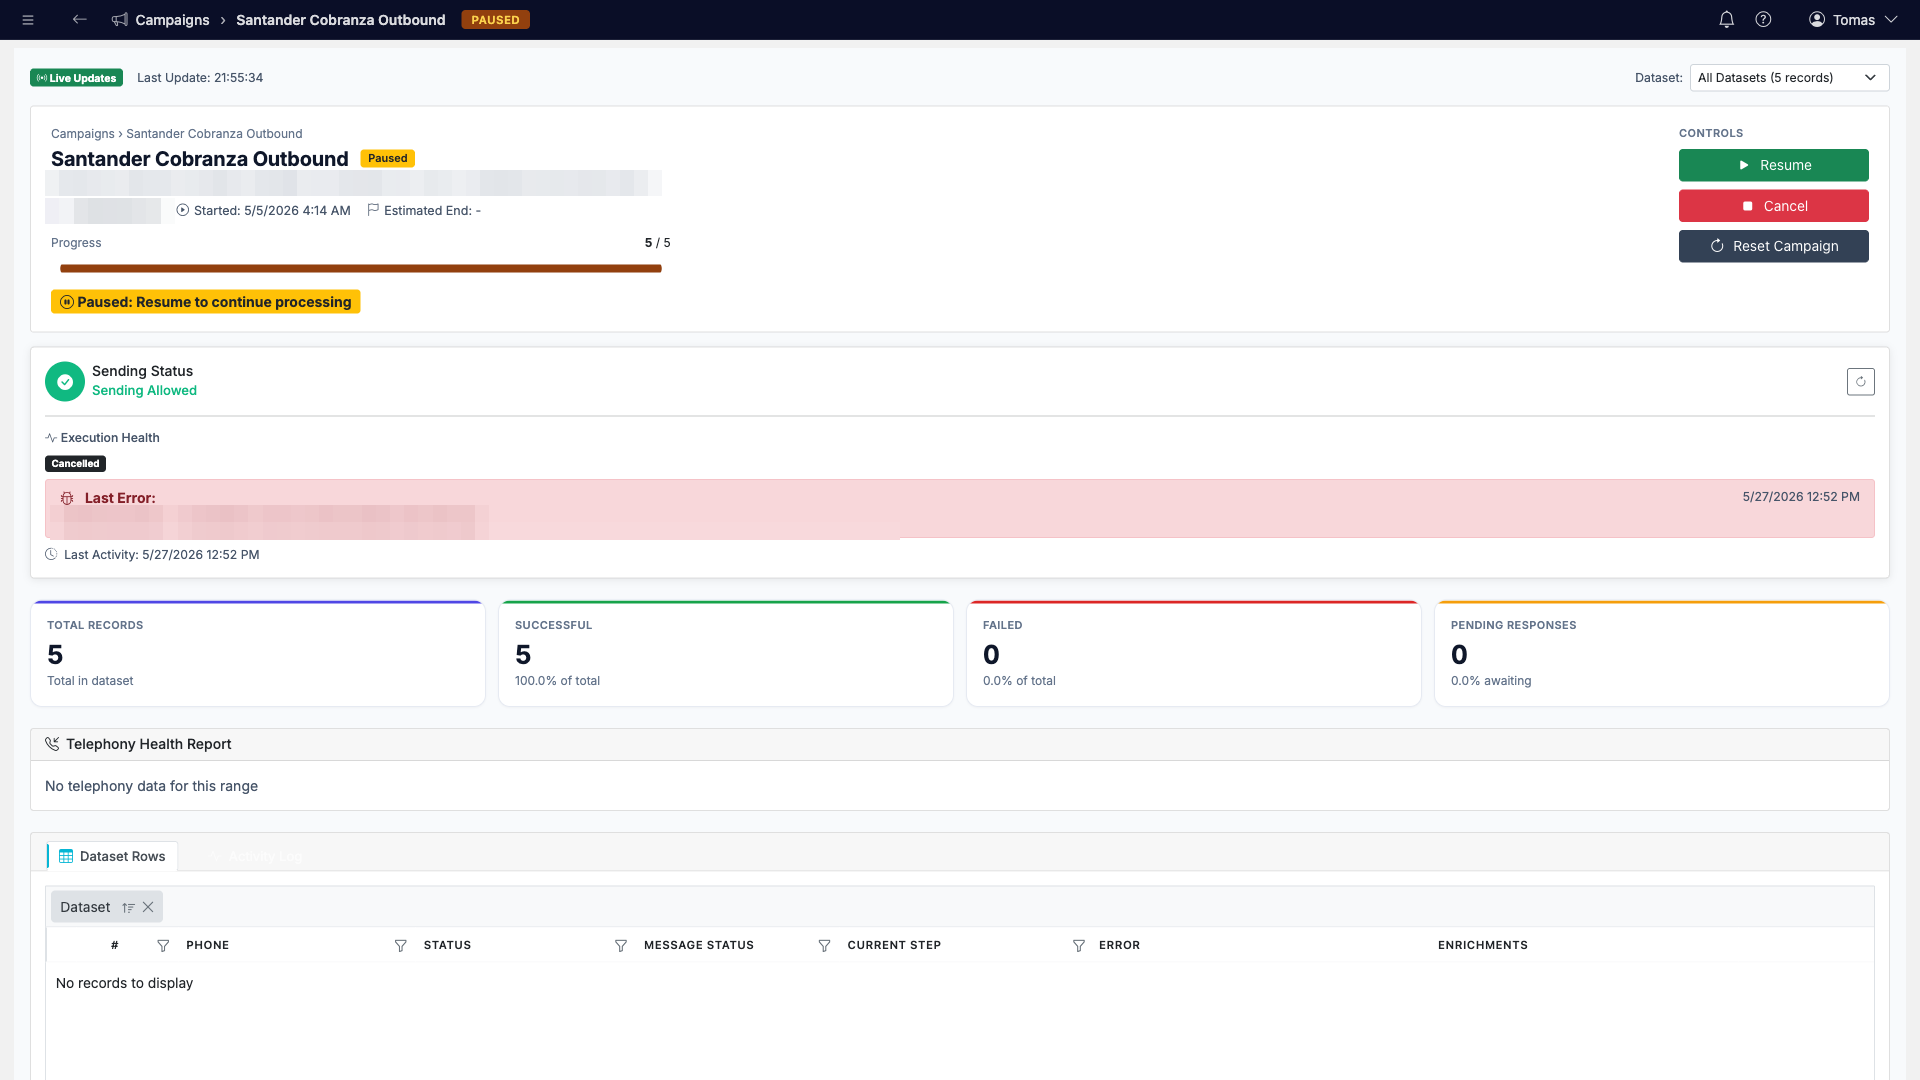
After (and during) the campaign, the Report tab generates the results view — call outcomes, typifications and per-number detail, exportable to PDF or raw data:
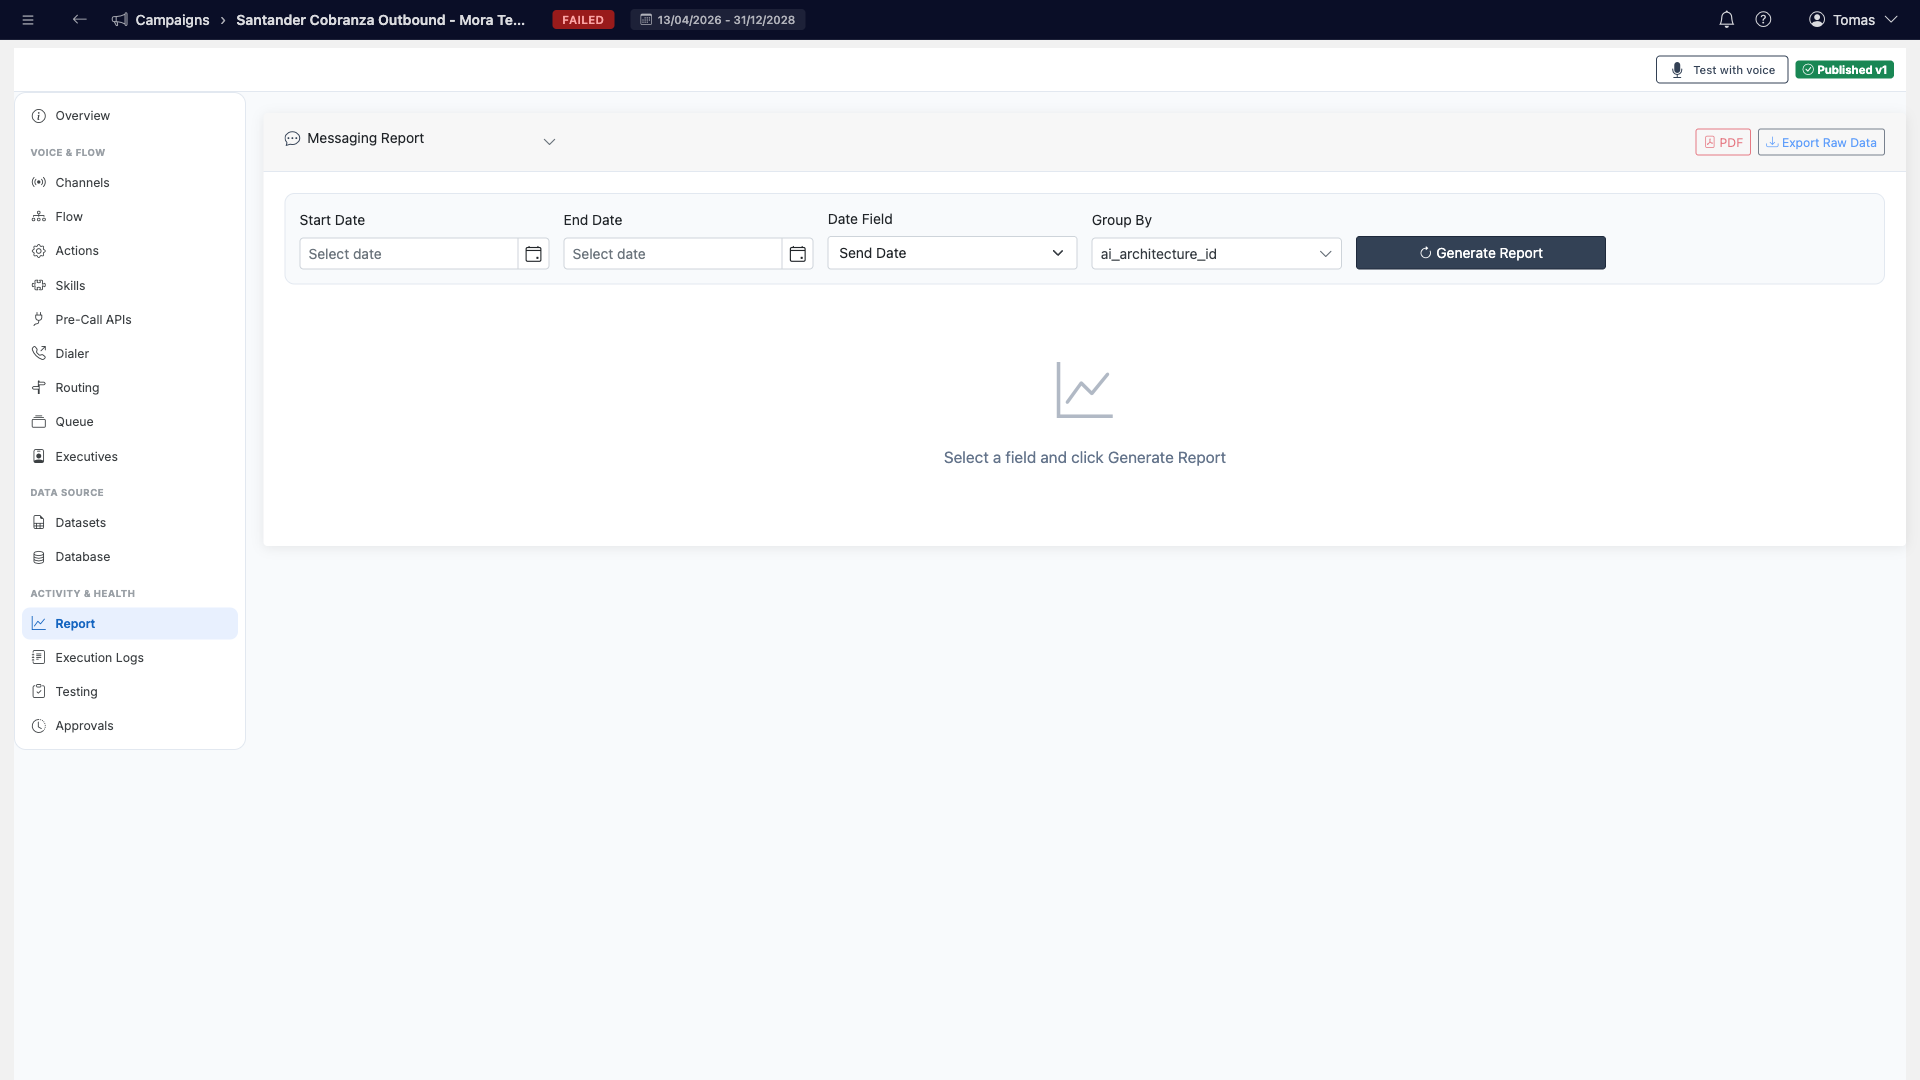
- Execution Logs tab — the detailed run-by-run history.
- AI Auditing — if you linked an Evaluation Engagement (Step 3), every call arrives there scored against your evaluation script (see the AI Auditing guide).
- Exports — dataset results from the Datasets tab, database records from the Database tab (Excel), and full results from the monitor.
CLI alternative — pull results
auralytik data campaigns                    # campaign summaries
auralytik data calls                        # call records
auralytik data evaluations                  # AI evaluation results

# Export all AI calls for a period (CSV) and wait for the file
auralytik export ai-calls --from 2026-07-01 --to 2026-07-31 --format csv --wait
CLI Quick Reference & Coverage
The full outbound provisioning sequence the CLI covers, end to end:
auralytik config login                                     # sign in
auralytik client list                                      # find <clientId>

# 1. Phone number (admin)
auralytik voice-arch list
auralytik voice-channel create --client <clientId> --did +56981325844 \
  --voice-arch <archId> --caller-id 981325844 --dial-prefix 333 \
  --strip-country-code 56 --max-concurrent 10

# 2. Campaign + flow + prompt in one shot (Draft)
auralytik campaign provision --client <clientId> --name "My Outbound Campaign" \
  --voice-arch <archId> --channel <channelId> --prompt-file prompt.txt \
  --max-concurrent 10

# 3. Wire the channel (if created separately)
auralytik campaign attach-channel --client <clientId> \
  --campaign <campaignId> --channel <channelId>

# 4. Bot actions: list / inspect / clone / assign to flow
auralytik action list --client <clientId>
auralytik action get <actionId> --client <clientId>
auralytik action copy --client <srcClientId> --source <actionId> \
  --to-client <clientId> --to-campaign <campaignId>
auralytik flow set-actions --client <clientId> --flow <flowId> \
  --actions <actionId1>,<actionId2>

# 5. Verify + results
auralytik campaign list --client <clientId>
auralytik flow get <flowId> --client <clientId>
auralytik data campaigns
auralytik export ai-calls --from <date> --to <date> --format csv --wait
What the CLI covers vs. the web platform:
CLI ✓
Sign-in and profiles · client discovery · voice architectures · voice channel / DID creation · one-shot campaign provisioning (campaign + flow + prompt + concurrency) · channel attachment · action list/inspect/clone · assigning actions to the flow · campaign listing · data queries and exports.
Web platform only
Master database import · dataset upload & ingestion · creating/editing actions from scratch · skills/playbooks and contexts · dialer settings · sending schedule · review/approve/publish · activation · dataset execution · live monitor.